| View previous topic :: View next topic |
| Author |
Message |
wexcellent
Joined: 28 Sep 2023
Posts: 13
City/Region: Portland
State or Province: OR
C-Dory Year: 2002
C-Dory Model: 22 Cruiser
Vessel Name: Spicy G
Photos: Spicy G
|
 Posted: Thu Jan 16, 2025 7:07 pm Post subject: Another Gas Tank Cleat Srew Hole Repair Post Posted: Thu Jan 16, 2025 7:07 pm Post subject: Another Gas Tank Cleat Srew Hole Repair Post |
 |
|
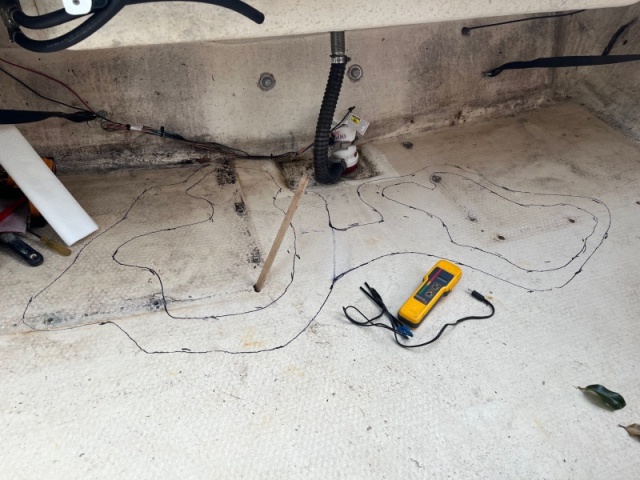
I have a couple of questions. I have an old Protimeter Surveymaster that I paid over $500 for 24 years ago. I have long probes for it so I was able to survey the sole without penetration as well as drill test holes and verify what my survey readings meant. I mapped out where the sole is wet as pictured. Outside the outer survey line is where moisture readings dip below 20% and inside the inner line is where they climb above 30%.
The screw holes were previously half-ass repaired. But before about 2 years ago the boat was kept mostly covered so I don't think water penetration was a big deal. I am guessing most of the saturation is more recent and that is why there isn't more rot or delamination. I drilled out the old repairs/holes to half inch and on all but one the balsa seems sound and has no discoloration.
Here are my questions:
1. I saw that several people have drilled spaced holes to allow the core to dry out. I am thinking to do this using 1/4" holes drilled most of the way through and then over the next month or more run a heater or fan under the transom. I was thinking of spacing these holes 3" apart, as that is the outer spacing limit for using my moisture meter probes to verify things have dried out. Is that enough to get it to dry or do I need to drill larger or more holes?
2. One of the 1/2" holes has some rot in it and in trying to clean it out it seems to extend anywhere from 1/2" to 1+" around the hole. I would like to actually enlarge the hole so that I can make sure and clean it out well. Just curious what is the maximum size epoxy patch one would want to do before actually doing a core patch and glassing the repair?
3. In drilling out the old holes which had been half ass repaired with epoxy I noticed that some of the balsa that came out was sticky, like it was saturated with uncured epoxy or hardener or something. Just curious if someone might know what that is from?
Thanks!
_________________
2002 Cruiser 22' - "Spicy G" |
|
| Back to top |
|
 |
clayhubler
Joined: 03 Aug 2019
Posts: 375
City/Region: La Center
State or Province: WA
C-Dory Year: 2003
C-Dory Model: 22 Cruiser
Vessel Name: Hammerhead
Photos: Merlin and Hammerhead
|
| Posted: Thu Jan 16, 2025 9:20 pm Post subject: |
|
|
If that area is all that you intend to repair I would just cut it out and re core and re glass. It's mostly under the tanks so you wont really see the patch job. Its a small area so not too big of a job. Could be done in less time that drying it.
1) Seems reasonable to me, might take a while to dry
2)I don't see a problem with doing a large patch like that but I would probably use thickened epoxy and probably still glass over the top. You would probably need to pour the epoxy in over a few different pours because it would definetely get too hot as a single plug.
3) Dont know what that might be but I would get it out of there
_________________
Clay
Hammerhead
2003 22 Cruiser
Merlin
1986 26 Cruiser |
|
| Back to top |
|
|
Schuster
Joined: 25 Mar 2009
Posts: 185
City/Region: Port Orchard
State or Province: WA
C-Dory Year: 2007
C-Dory Model: 25 Cruiser
Vessel Name: Sea Witch
Photos: Sea Witch
|
| Posted: Fri Jan 17, 2025 10:11 am Post subject: |
|
|
If this were my project I would be more inclined to cut out a rectangular area to 1, be able to assess the entire problem as to weather you have rot and how extensive it is and 2, it will give you good access to dry it out and replace any balsa if required.
I'm not a fan of drilling holes and putting a heater under the hull because in order to dry it out you're going to want to pass air across the holes to carry the moisture away. The moisture trapped inside the hull has nowhere to go and by heating it up makes a good mold environment. Maybe larger holes would help. But again I would cut out a patch and if everything seems sound put a fan on it for a week or so until you get good moisture readings, then fiberglass the patch back in. This will also give you an opportunity to address the existing holes to drill them out oversized and epoxy them for the new mounting screws for the tanks. Good luck.
_________________
Dave
(Sea Witch)
25' Cruiser |
|
| Back to top |
|
|
shad
Joined: 21 Aug 2024
Posts: 34
City/Region: Seattle
State or Province: WA
C-Dory Year: 2002
C-Dory Model: 22 Cruiser
Vessel Name: C-Squatch
Photos: C-Squatch
|
| Posted: Fri Jan 17, 2025 1:24 pm Post subject: |
|
|
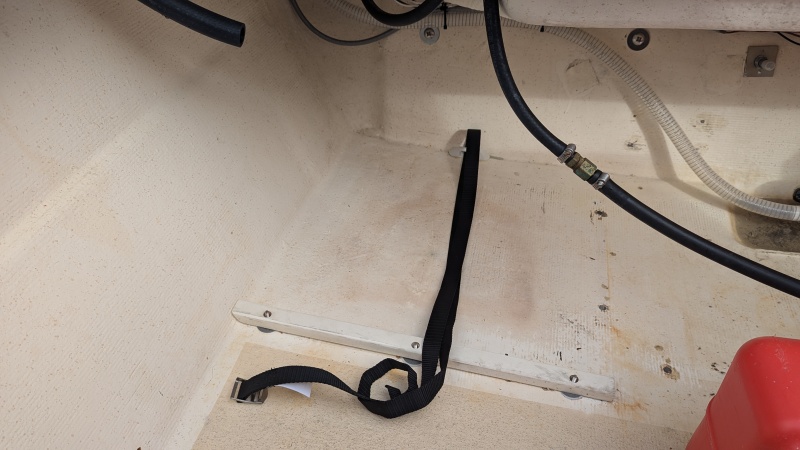
Somewhat related to your post, I recently removed the old fuel tank cleat screws on my 2002 22 Cruiser.
I researched most of the fuel tank cleat mods on the forum, and a here's my summary of the options:
1. Over-drill, epoxy, and re-install screws. Pros: Cheap, fast, and easy. Cons: Still have screws in the deck.
2. Use fiberglass to attach wood or composite/G10 rails. Screw into the rails rather than the deck. Pros: No screws in deck. Cons: Labor intensive and messy. Wood rails can still rot out.
3. Weld Mount studs. Pros: Fast. Easy. No screw holes in deck. Cons: Expensive. Longevity unproven.
Water intrusion appeared to be minimal, so I opted to epoxy the holes and use Weld Mount studs and footman's strap mounts. The Weld Mounts seem to be holding and eliminate core screw holes without much effort. I did not bother re-adding the side cleats, since a DIY raised platform fits in between the tanks.
Weld Mount component links below.
|
|
| Back to top |
|
|
wexcellent
Joined: 28 Sep 2023
Posts: 13
City/Region: Portland
State or Province: OR
C-Dory Year: 2002
C-Dory Model: 22 Cruiser
Vessel Name: Spicy G
Photos: Spicy G
|
| Posted: Fri Jan 17, 2025 3:29 pm Post subject: |
|
|
Thanks for all the input. Looks like I will probably just be cutting it out and patching it eventually (before summer). I am going to be treating the transom penetrations as well so I think I will dismount the main and kicker before cutting up the sole to reduce any chance of deflection (I have a bunk trailer and the transom is fully supported on the bunks but still....).
I have scrap 1/2" Corian Solid Surface materials (it is actually Formica brand) I think I'll do an experiment to see how well it epoxies to the sole skin material. May use that for the cleats and glue them in. It supposedly does fine with UV exposure and is used in outdoor kitchens. I have had some installed in full sun for 2 years now and it seems fine. If not that I really like Shad's solution with the epoxied studs. |
|
| Back to top |
|
|
thataway
Joined: 02 Nov 2003
Posts: 21507
City/Region: Pensacola
State or Province: FL
C-Dory Year: 2007
C-Dory Model: 25 Cruiser
Vessel Name: thataway
Photos: Thataway
|
| Posted: Fri Jan 17, 2025 10:58 pm Post subject: |
|
|
I agree with the re-coring. The try to dry out with multiple holes in the hull is iffy. I have been involved with drying out hull cores for many years (also osmosis damage--in some boats to failure of the hull. I have seen a hull take over a year, with hot pads and vacuum--to the end result--15 years later the core was still dry. But the repair cost over $50,000.
_________________
Bob Austin
Thataway
Thataway (Ex Seaweed) 2007 25 C Dory May 2018 to Oct. 2021
Thisaway 2006 22' CDory November 2011 to May 2018
Caracal 18 140 Suzuki 2007 to present
Thataway TomCat 255 150 Suzukis June 2006 thru August 2011
C Pelican; 1992, 22 Cruiser, 2002 thru 2006
Frequent Sea; 2003 C D 25, 2007 thru 2009
KA6PKB
Home port: Pensacola FL |
|
| Back to top |
|
|
mofowles
Joined: 21 Jul 2024
Posts: 1
City/Region: Tacoma
State or Province: WA
C-Dory Year: 1990
C-Dory Model: 22 Cruiser
|
| Posted: Tue Jan 21, 2025 10:01 pm Post subject: |
|
|
I am in the process of starting the same project on a 1990 22'. I brought the boat with elevated moisture in the cockpit floor and transom around the kicker outboard mount.
My plan is to remove the deck from the cabin aft, and the transom core, and replace it all with foam. Then infuse the top layer of glass over the whole thing tying it into the cabin bulkhead (which is detached on the older models).
I will be following along your updates here and I will try to provide some of my own. |
|
| Back to top |
|
|
thataway
Joined: 02 Nov 2003
Posts: 21507
City/Region: Pensacola
State or Province: FL
C-Dory Year: 2007
C-Dory Model: 25 Cruiser
Vessel Name: thataway
Photos: Thataway
|
| Posted: Tue Jan 21, 2025 11:55 pm Post subject: |
|
|
'there is a reason that balsa core is used to begin with, and replacement. Great product, as long as you don't get water into it. Foam will also fail, if water gets in--especially if there are freeze and thaw cycles as the boat is left out of doors in the winter.
The shear strength is better than foam with balsa. Also a bit stiffer, and adhesion with epxoy (or vinyl ester resin). Good reasons not to use polyester resin for repairs, because of bonding strength--highest being epxoy--also epoxy is also more "water proof" than polyester. Vinyl /ester resins are about half way betwen epoxy and polyester. Some of us have been doing these type if repairs for over 50 years. When I was in Europe, we looked at hundreds of boats which had core/laminate failure. Same in the Caribbean. Our Cal 46 had spent 10 years in charter service in the Caribbean. It needed extensive restorative work. |
|
| Back to top |
|
|
|
 Search
 Private Messages
 Profile
 Log in
 Register
 Help
Help
