| View previous topic :: View next topic |
| Author |
Message |
colbysmith
Joined: 02 Oct 2011
Posts: 4964
City/Region: Madison
State or Province: WI
C-Dory Year: 2009
C-Dory Model: 25 Cruiser
Vessel Name: C-Traveler
Photos: C-Traveler and Midnight-Flyer
|
 Posted: Sat Nov 07, 2015 9:54 pm Post subject: Webasto Heater Installation Posted: Sat Nov 07, 2015 9:54 pm Post subject: Webasto Heater Installation |
 |
|
There have been several other threads on this subject, but rather than hijacking other threads to add my installation of this heater, decided to start a new thread. I'll post as I go along, looking for any advice, suggestions or critique on my installation.
After much thought on rather or not to replace my current one burner Keynon Kiss butane stove with a Wallas combination unit, I decided to go with a heater only and leave my stove alone. (Which works well for our use.) Looking at various models, I decided to go with the Webasto Airtop 2000 ST Diesel. I was able to purchase a standard heater kit off of Ebay for $900. In speaking with a Webasto rep, I learned that the standard heater is the exact same heater also used in the Marine applications that is much more expensive. Such items as copper fuel line rather than plastic, and an enclosed fuel pump come with the marine kit. After receiving the standard kit, I also went to Sure Marine to order the Exhaust thru-hull port ($129), a side mounting bracket ($51) and an hot exhaust insulating sock ($70). Now that I've started the installation, I realize I will not need the side mount, so plan to return that. I will be ordering the plastic see through tank that Wallas uses, from Scan Marine (10L $50).
I chose to mount my heater in the cabinet directly underneath the sink, against the starboard hull. This space is unused, and the heater should not be in the way of the other stuff I store in this cabinet. My plan is to leave the cabin and combustion air intakes open, rather than running ducts to the outside. I will be installing several louver vents in the cabinet doors to allow better air circulation.
Tonight I temporarily "hung" the mounting plate in it's position, and used Loctite Marine Epoxy to glue mounting bolts to the hull. I glued 2 more bolts to the area right below, as I will then attach some fabricated brackets between this position, and the inboard side of the mounting plate.
Continuing this installation in the next day or two, plans are to put the warm output air vent just below the left (forward) corner of the sink. Not sure where I'll mount the rheostat yet. I will mount the fuel tank in the bottom of the compartment either forward or aft, haven't decided which yet, but aft makes more sense with out the fresh water lines, or shift linkage in the way.
Last edited by colbysmith on Sat Nov 07, 2015 10:12 pm; edited 1 time in total |
|
| Back to top |
|
 |
colbysmith
Joined: 02 Oct 2011
Posts: 4964
City/Region: Madison
State or Province: WI
C-Dory Year: 2009
C-Dory Model: 25 Cruiser
Vessel Name: C-Traveler
Photos: C-Traveler and Midnight-Flyer
|
| Posted: Sat Nov 07, 2015 10:10 pm Post subject: |
|
|
Chosen location to install heater:

Mounting Plate temporarily hung:

Mounting plate bolts set in epoxy:
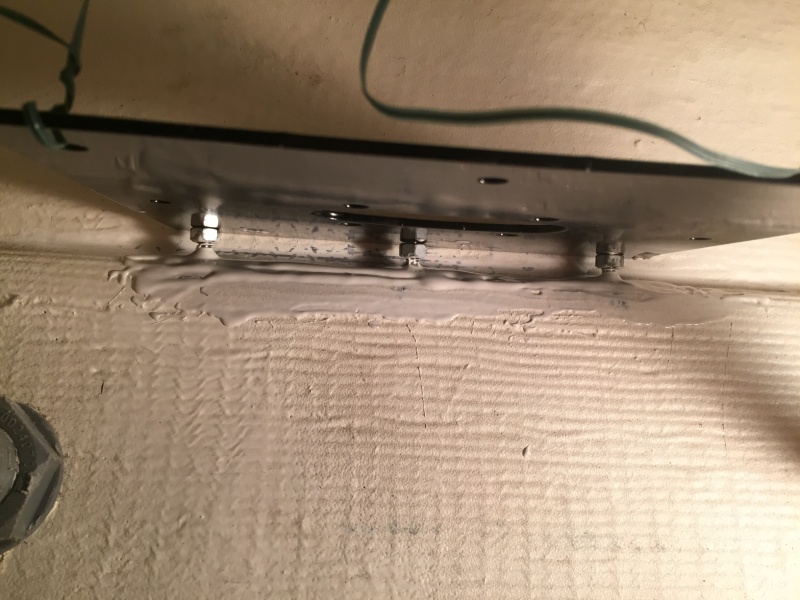
The bottom nuts, under the plate, will come off once the epoxy sets. I just wanted to insure the angle on the bolts was proper for getting the plate level, as the strake or ledge there is not exactly "level".
Bolts below will be to hold brackets supporting port side of mounting plate:
 |
|
| Back to top |
|
|
Salmon Fisher
Joined: 07 Aug 2009
Posts: 874
City/Region: Arlington
State or Province: WA
C-Dory Year: 2004
C-Dory Model: 25 Cruiser
Vessel Name: Kim Christine
Photos: Kim Christine
|
| Posted: Sat Nov 07, 2015 11:01 pm Post subject: |
|
|
Very timely post as I am considering the same thing in the future for our 25.
Looks really good!
_________________
Patrick and Kim Walker
2004 25 Cruiser-Present
2000 22 Cruiser 2009-2014 (Sold)
2006 25 Cruiser 2014-2019 (Sold)
1985 22 Classic -2019 (Sold)
1991 19 Arima Sea Ranger-2019-2021 (Sold)
2015 27 Ranger Tug-2019-2023 (Sold)
1987 22 Cruiser -2021-2023 (Sold)
Honey, this REALLY will be my last boat, honest! |
|
| Back to top |
|
|
Discovery
Joined: 08 Dec 2003
Posts: 1245
City/Region: LOA, UTAH
State or Province: UT
C-Dory Year: 2006
C-Dory Model: 255 Tomcat
Vessel Name: Discovery
Photos: Discovery
|
| Posted: Sun Nov 08, 2015 12:39 am Post subject: |
|
|
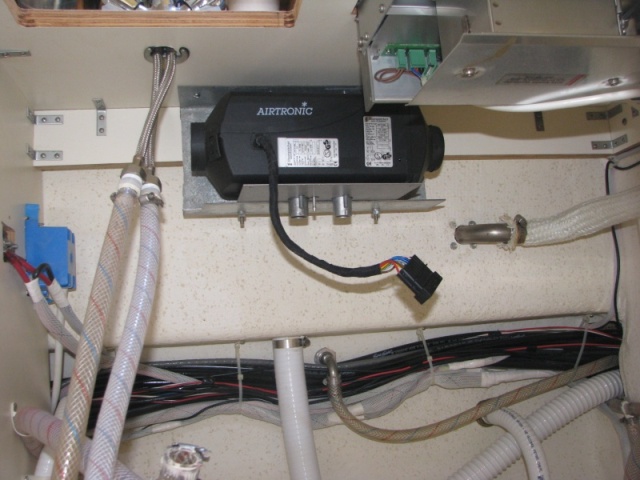
I mounted our heater behind the sink, up tight to the counter top.
_________________

Brent and Dixie,
1984 22' Classic sold 2003
2003 24' TomCat sold 2005
2006 TC255 Discovery Sold 2020
2006 CD 22' Angler Sold 2014
https://share.delorme.com/FBrentBetenson
"Free men do not ask permission to bear arms." ~ Thomas Jefferson |
|
| Back to top |
|
|
colbysmith
Joined: 02 Oct 2011
Posts: 4964
City/Region: Madison
State or Province: WI
C-Dory Year: 2009
C-Dory Model: 25 Cruiser
Vessel Name: C-Traveler
Photos: C-Traveler and Midnight-Flyer
|
| Posted: Sun Nov 08, 2015 8:58 am Post subject: |
|
|
That looks like a great place to mount it also. If I find that the epoxy isn't strong enough to hold the bolts in position with the mounting plate installed, I will probably keep the side mount plate I have on order, and try to mount the heater a little higher and find a way to fabricate that bracket to the countertop. I really don't want to put bolts thru the hull!
I'm assuming that thru hull just right of the heater is an exhaust port? I'm wondering where most folks are mounting that thru hull. If I mount it between the sink and Kiss stove drains, it's barely at 12" above the water line. But it's a little more recessed and protected. While if I mount it higher, (in the trim paint area), it's out there a little more, but much higher over the water. In either case, I will loop the exhaust line up as high as I can get it under and behind the sink, to try and keep any splash/spray from coming back in through that port.
Colby |
|
| Back to top |
|
|
Sunbeam
Joined: 23 Feb 2012
Posts: 3990
City/Region: Out 'n' About
State or Province: Other
C-Dory Year: 2002
C-Dory Model: 22 Cruiser
Photos: Sunbeam
|
| Posted: Sun Nov 08, 2015 10:09 am Post subject: |
|
|
| colbysmith wrote: |
I'm assuming that thru hull just right of the heater is an exhaust port? I'm wondering where most folks are mounting that thru hull. |
Brent will obviously know for sure. But if you mean the one just aft/below the airtronic black box, that looks like the Wallas stove/heater exhaust. I see what looks like part of a Wallas heater/stove in the upper right. |
|
| Back to top |
|
|
colbysmith
Joined: 02 Oct 2011
Posts: 4964
City/Region: Madison
State or Province: WI
C-Dory Year: 2009
C-Dory Model: 25 Cruiser
Vessel Name: C-Traveler
Photos: C-Traveler and Midnight-Flyer
|
| Posted: Sun Nov 08, 2015 10:41 am Post subject: |
|
|
| Thanks Sunbeam. That is what I was looking at. |
|
| Back to top |
|
|
ssobol
Joined: 27 Oct 2012
Posts: 3589
City/Region: SW Michigan
State or Province: MI
C-Dory Year: 2008
C-Dory Model: 22 Cruiser
Vessel Name: SoBELLE
Photos: SoBelle
|
| Posted: Sun Nov 08, 2015 10:50 am Post subject: |
|
|
From the pictures it looks like there are two bolts for the rub rail right about where you are mounting the heater. If the bolt/epoxy thing doesn't work, I would consider putting bolts through from the outside under the rub strip. You could easily fab a metal bracket that hung down from those bolts. May then you could also use some of the epoxied bolts just for stabilization rather than carrying most of the weight of the heater.
The problem is going to be the impact loads from whenever you get pounded in the waves (no matter how hard you try to avoid it, it still will happen occasionally). |
|
| Back to top |
|
|
thataway
Joined: 02 Nov 2003
Posts: 21497
City/Region: Pensacola
State or Province: FL
C-Dory Year: 2007
C-Dory Model: 25 Cruiser
Vessel Name: thataway
Photos: Thataway
|
| Posted: Sun Nov 08, 2015 11:33 am Post subject: |
|
|
Unless you are supporting the heater in some other way (such as threaded rod or a long bolt from the top--could use a connector nuts, to make a hanging bracket) than the bolts epoxied to the hull; I think there is too much leverage on the bolt epoxied to the hull to make a safe installation without other support. If you made a bracket out of wood, or metal, to give under the body of this bracket, it would be much stronger. Think about a shelf support. Would you ever mount a shelf by its inboard side, without supports under or at the ends? For me, the answer is no. I would not.
I believe that ssobol's concerns about jarring or impact loads are valid. You don't want a diesel heater coming loose!
My Wallas exhaust is in the middle of the colored stripe. (The Tom Cat 255 is going to be considerably different. )
On edit, I would probably epoxy two "T" nuts into the underside of the counter, and then use threaded rod to hold the outer end of the bracket (where you have strings or wires now. I would put a nut above and below the bracket, to keep it from bouncing. The only "trick" with epoxy the "T" nuts in upside down, is to prevent epoxy into the threaded part. You can either wax a bolt and put it into the threads, when you epoxy it into place. This will prevent epoxy from getting down into the threads. I would probably use JB Weld for wood as the epoxy--after cleaning off the "T" nuts well, with soap and water, then acetone, to get rid of any oil or grease.
_________________
Bob Austin
Thataway
Thataway (Ex Seaweed) 2007 25 C Dory May 2018 to Oct. 2021
Thisaway 2006 22' CDory November 2011 to May 2018
Caracal 18 140 Suzuki 2007 to present
Thataway TomCat 255 150 Suzukis June 2006 thru August 2011
C Pelican; 1992, 22 Cruiser, 2002 thru 2006
Frequent Sea; 2003 C D 25, 2007 thru 2009
KA6PKB
Home port: Pensacola FL |
|
| Back to top |
|
|
colbysmith
Joined: 02 Oct 2011
Posts: 4964
City/Region: Madison
State or Province: WI
C-Dory Year: 2009
C-Dory Model: 25 Cruiser
Vessel Name: C-Traveler
Photos: C-Traveler and Midnight-Flyer
|
| Posted: Sun Nov 08, 2015 6:55 pm Post subject: |
|
|
I'll be the first to admit that my concern with the epoxied bolts is stress taken from jarring waves. (Been there, done that, and it'll happen again....  The epoxy does say 3000 lb strength though. But I've seen epoxy pull away from material before. Also, to be clear about the brackets, there will be two brackets coming up from those bottom two bolts, to attach to the starbord side of the mounting plate. (Think of closet shelves with a 45 degree bracket between the wall below and outer edge of the shelf.) However, again those 5 bolts are all epoxied to a hull that is subject to waves and "hard docking" (God forbid...lol, but every once in a rare while it happens...). Reading thru the threads, I see one person had used some high strength sealant to glue plywood to the hull, then used bolts thru that. I did do some more work on the installation today, (comments to follow), but still waiting for those bolts to set. The epoxy says 24 hours for full cure, so I want to give it time to cure before I see how strong it is. I guess I'll find out tomorrow! Colby The epoxy does say 3000 lb strength though. But I've seen epoxy pull away from material before. Also, to be clear about the brackets, there will be two brackets coming up from those bottom two bolts, to attach to the starbord side of the mounting plate. (Think of closet shelves with a 45 degree bracket between the wall below and outer edge of the shelf.) However, again those 5 bolts are all epoxied to a hull that is subject to waves and "hard docking" (God forbid...lol, but every once in a rare while it happens...). Reading thru the threads, I see one person had used some high strength sealant to glue plywood to the hull, then used bolts thru that. I did do some more work on the installation today, (comments to follow), but still waiting for those bolts to set. The epoxy says 24 hours for full cure, so I want to give it time to cure before I see how strong it is. I guess I'll find out tomorrow! Colby |
|
| Back to top |
|
|
Discovery
Joined: 08 Dec 2003
Posts: 1245
City/Region: LOA, UTAH
State or Province: UT
C-Dory Year: 2006
C-Dory Model: 255 Tomcat
Vessel Name: Discovery
Photos: Discovery
|
| Posted: Sun Nov 08, 2015 7:05 pm Post subject: |
|
|
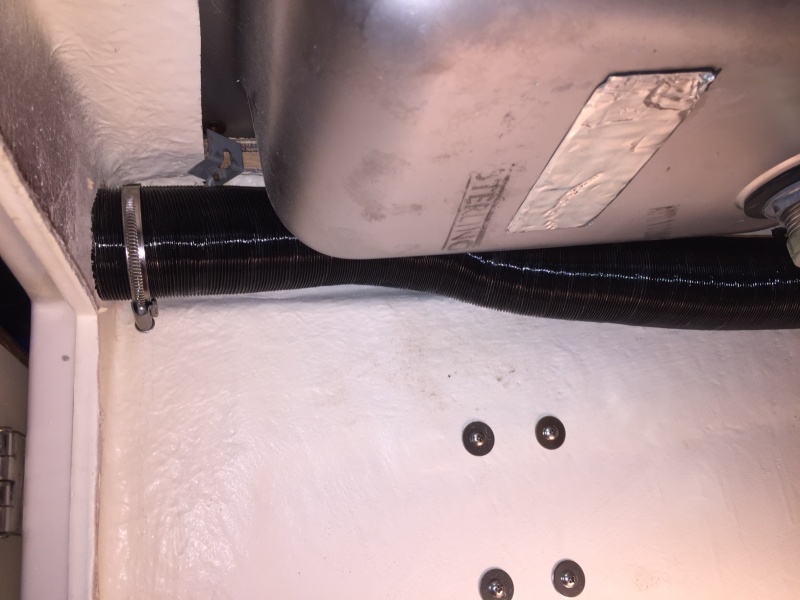
The thru hull to the right of the heater is from the Wallas Stove.
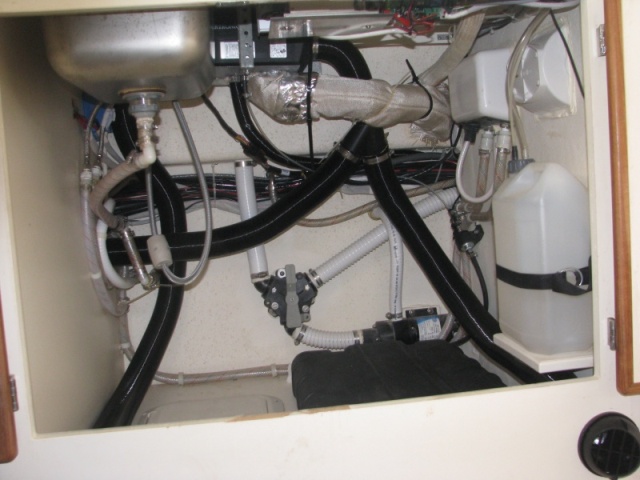
The finished install. The new heater thru hull exits just behind the Wallas exhaust.
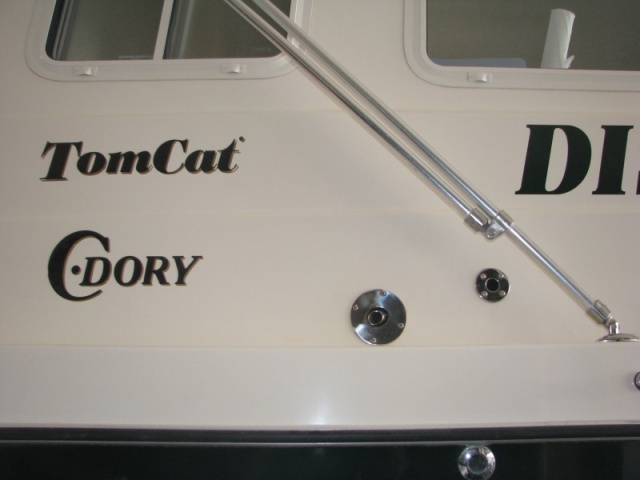
Thru hulls from outside. Wallas forward and Airtronic behind. |
|
| Back to top |
|
|
thataway
Joined: 02 Nov 2003
Posts: 21497
City/Region: Pensacola
State or Province: FL
C-Dory Year: 2007
C-Dory Model: 25 Cruiser
Vessel Name: thataway
Photos: Thataway
|
| Posted: Sun Nov 08, 2015 7:11 pm Post subject: |
|
|
Colby,
What you have to look at is the lever arm. Yes, the epoxy can hold 3,000 lbs PSI in shear, between two properly prepared steel plates. That is a lot different application than you have here. (a direct lifting component). But how well is the adhesion to that surface? I don't see any evidence you have ground the fiberglass down to bare substrate before applying the epoxy. If there was a 1/4" thick steel plate epoxied in with the bolts, and this hung out at least half of the distance of the mounting plate, I would feel better. You are dealing with small surface which is adherent. I assume that you have flat head bolts, and that the epoxy is over the bevel--which will help hold it.
Not sure I visualize the 45 degree brackets--if they are going out lets say 3" down on the hull, and 3" out on the mounting plate, plus were solid material on the 45* between the vertical and horizontal, that would help a lot.
Just a comment: before I apply epoxy to the side of the hull, I grind off the interior "paint or gel coat (?). it has poor adhesion to the substrate--and the molded part will have had wax from the laminating resin. |
|
| Back to top |
|
|
colbysmith
Joined: 02 Oct 2011
Posts: 4964
City/Region: Madison
State or Province: WI
C-Dory Year: 2009
C-Dory Model: 25 Cruiser
Vessel Name: C-Traveler
Photos: C-Traveler and Midnight-Flyer
|
| Posted: Sun Nov 08, 2015 10:08 pm Post subject: |
|
|
Bob, I understand exactly what you are saying, and again, that is a concern of mine. I did sand down the fiberglass at the points where the bolts are, and they are cone shaped, or flat head. To be honest, I kind of have my doubts if this is going to work at this first attempt. I'll test them tomorrow. I have used epoxy before, but find on flat surfaces, regardless how much you grind it down, it just has a hard time adhering. The JB Weld may be great at some things, but it's not the same as a real weld, that actually fuses metal together.  (I used a marine epoxy here, which is made for fiberglass, and there is enuf encasing the bolt head that it shouldn't break out of the epoxy.) As for the additional brackets, don't know if I can explain any better, but I think you have the idea when you said that would help a lot. Those two brackets, once installed will actually provide a lot of support, in that the mounting plate will push down on them, and so they are actually pushing down and out on those bottom bolts that are held to the hull ridge with the epoxy. So really, when it's all done, the weight of the mounting plate is laying on those "strakes" or ridges, but any side force away from the hull, or "up" force will have to be held by the epoxy. (I used a marine epoxy here, which is made for fiberglass, and there is enuf encasing the bolt head that it shouldn't break out of the epoxy.) As for the additional brackets, don't know if I can explain any better, but I think you have the idea when you said that would help a lot. Those two brackets, once installed will actually provide a lot of support, in that the mounting plate will push down on them, and so they are actually pushing down and out on those bottom bolts that are held to the hull ridge with the epoxy. So really, when it's all done, the weight of the mounting plate is laying on those "strakes" or ridges, but any side force away from the hull, or "up" force will have to be held by the epoxy.
Anyway, this is what I accomplished today:
I ended up mounting the rheostat at the helm, just beneath my trim tab controls. While the installation instructions suggest running the power wires directly to the battery, I decided not to, and instead ran them to my electrical panel on the vberth bulk head. While the fuse required is a 15 amp, the wiring loom in the kit used what appears to be 16 gauge wire. I reworked my electrical panel last year, running 6 gauge battery wire from the main switch at the battery to my electrical panel, so am confident I have plenty of capacity to add the heater into that panel. And two less wires to run in the mess that is already just about too much to get the cockpit side compartments back into position. I mounted the hot air vent just behind the seat, under the forward corner of the sink.
Last edited by colbysmith on Sun Nov 08, 2015 10:26 pm; edited 1 time in total |
|
| Back to top |
|
|
colbysmith
Joined: 02 Oct 2011
Posts: 4964
City/Region: Madison
State or Province: WI
C-Dory Year: 2009
C-Dory Model: 25 Cruiser
Vessel Name: C-Traveler
Photos: C-Traveler and Midnight-Flyer
|
| Posted: Sun Nov 08, 2015 10:24 pm Post subject: |
|
|
Rheostat located at helm just below trim tab switches:
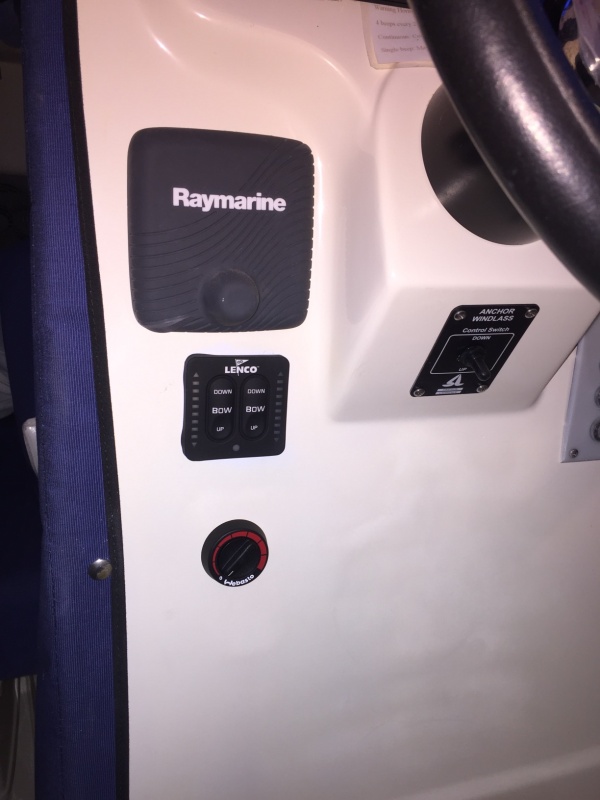
View of hot air vent from under sink, just behind helm seat:
Hot air vent installed just behind helm seat, forward cabinet just under sink:

(You can see exhaust tubing laying partially in sink....things are just kind of scattered about while I'm working on it.  |
|
| Back to top |
|
|
colbysmith
Joined: 02 Oct 2011
Posts: 4964
City/Region: Madison
State or Province: WI
C-Dory Year: 2009
C-Dory Model: 25 Cruiser
Vessel Name: C-Traveler
Photos: C-Traveler and Midnight-Flyer
|
| Posted: Mon Nov 09, 2015 7:38 pm Post subject: |
|
|
Well, doing my own stress test, the bolts didn't hold. I think they may have been fine in use, but did not hold up to putting a fair amount of pressure on each bolt singularly, pulling them away from the hull. So, I cleaned up the old epoxy, did a much better job of grinding the surface clean, the entire length of where I would mount the plate, and attempted it again. This time, I used a length of aluminum stock to put the bolts thru, then epoxied the entire length of that to the top of the hull ridge. (Not sure what you call those steps. Chines? Strakes? But it's the ridges in the hull where it's stepped out.) Same thing, but with shorter and separate pieces of stock for the lower bolts to hold the brackets. Here is a photo that might show in better detail the brackets that come up at an angle from the hull to attach to the opposite side of the plate from where it's attached at the hull.
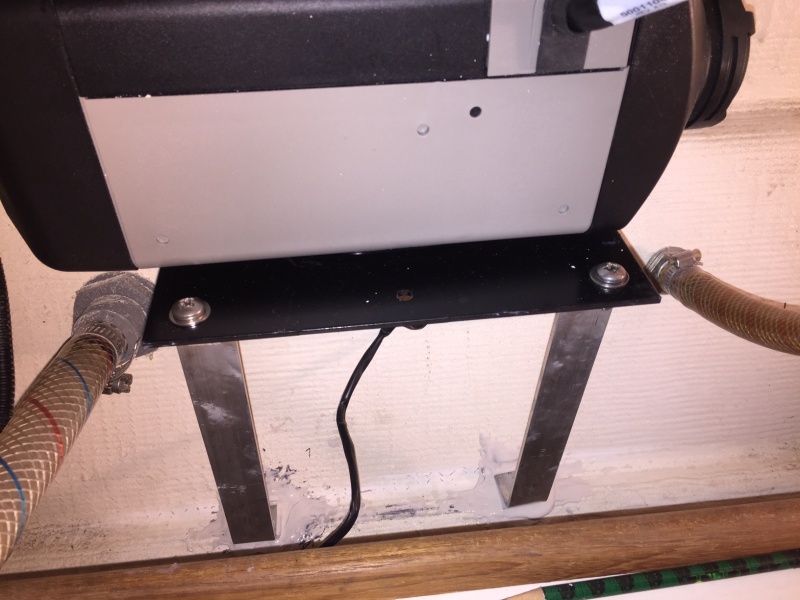
This is a photo of the mounting plate and heater just sitting on it (not attached yet), with the middle shelf in the view.

The epoxy needs to set for 24 hours before I "stress test" it again, so the heater is just sitting temporarily there right now. If this doesn't work, then I'll try something else. Colby |
|
| Back to top |
|
|
|
|
You cannot post new topics in this forum
You cannot reply to topics in this forum
You cannot edit your posts in this forum
You cannot delete your posts in this forum
You cannot vote in polls in this forum
You cannot attach files in this forum
You cannot download files in this forum
|
|
 Search
 Private Messages
 Profile
 Log in
 Register
 Help
Help
