anchor roller install questions!

ferret30

New member
Our 2006 22' came with a damaged anchor roller installed. It was quite small (maybe a Sundog brand?) the body was bent and the wheel was mangled. I ended up ordering a Lewmar fixed anchor roller (http://www.lewmar.com/products.asp?id=8361&lid=25869) from Defender to replace the old one.

The Lewmar is bigger and stronger, and the hole pattern is obviously different. I'm trying to figure out how to position it (how much to overhang) and there is no manual to consult. I want to have it far enough out that the Delta 14# doesn't hit the hull when launching or retrieving, but I also don't want to have it hang out far enough that it over-stresses the cored deck structure. When I do the install, I will fill the old holes and drill/dremel/epoxy/redrill the new ones.

I also ended up making an offer on a used Lewmar pivoting roller (http://www.lewmar.com/products.asp?id=8361&lid=25868) on ebay and getting it for $50. Once I have them both in hand I'll pick one to install and sell the other on ebay.

Any suggestions, rules of thumb, etc. on placing either type of roller? If you have either one of these rollers, would you mind measuring from the tip of the bow to the foremost bolt?

Also, would it make sense to try and make a backing plate instead of using fender washers? Or are large fender washers enough?

Thanks in advance for your input!
 
Agree with Tom. A rare event(not really :lol: ). Those things are expensive, go ahead with the pivioting one, even if you don't have a windlass now. After pulling 30+ ft of chain and 150 ft of rope rode a few times in bad weather, you soon will!! :thup :mrgreen:

Charlie
 
I prefer the pivoting bow anchor roller from Lewmar. It works with just about any anchor and windlass, and is strong and durable.

While you don't have a windlass yet, you can put a stainless bolt or clevis pin through it to lock it up rigidly, then let it pivot when you add the windlass later. No holes to fix and re-drill a second time that way!

I think the big fender washers will be OK, but a backing plate is always nice and reassuring.

Joe. :teeth :thup
 
I have the Lewmar pivoting bow roller and their matching Delta anchor. The combination works great with the windlass. Self launching and self stowing.

I've put holes in the boat in a few places for projects and I installed my own sink and Wallas stove/heater. Everywhere I've worked on the boat I've found it to be VERY solidly built. I'm sure when you open up the holes from the existing mounts you'll find a very thick and strong section there, too.

-Jeff
 
I've been perusing multiple galleries lately, looking for anchor roller pics. If you have the Lewmar pivoting roller, and a picture that shows it well in your gallery, could you let me know? I'll keep wading through the photos in the mean time.

Thanks!
 
ferret30":11ew11nt said:
I've been perusing multiple galleries lately, looking for anchor roller pics. If you have the Lewmar pivoting roller, and a picture that shows it well in your gallery, could you let me know? I'll keep wading through the photos in the mean time.

Thanks!

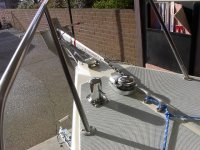
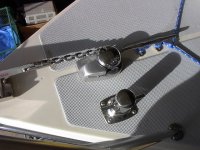
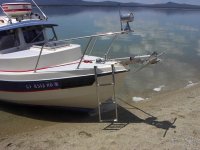
Here's some:

IM001970.jpg

IM001284.jpg

IM001285.jpg

IM001839.jpg

Joe :teeth :thup
 
I'll try to take a few shots of the install on THATAWAY and CAPTAIN'S CAT shortly. One is with the vertical 700 and one with the horizontal.

Charlie
 
Thanks for the pics! I think I have enough info to start the project when I get a dry weekend. This will be my first dremel/epoxy project. I have the materials and tools -- I just haven't been ready since I didn't know which roller to install and where. I think I can return the rigid roller to Defender (purchased less than 30 days ago).
 
I sent the fixed roller to Defender and will be installing the pivoting one. I'd like to drill holes in it so I can secure it in the up position as people have mentioned. I'll buy a pin first so I size the holes correctly. But I'm wondering how I should go about drilling through this thick stainless. I'm guessing I'd wear out my current bits, and I'm also betting the bit would skip around the surface when I tried to start the hole unless I use a guide or a center punch or something.

What do you guys recommend? I could probably take it to a machine shop nearby and just have them tackle it really fast with a drill press.
 
As Tom indicates, it's not that tough with good bits designed for cutting metal. Titanium or cobalt bits work best. You will need to use a center punch to keep the bit from wandering initially and I find that it's useful to drill a smaller (about 1/2 the final diameter) pilot hole first. To keep the bit cool, use a fairly low speed on the drill and use oil (applied repeatedly) during drilling to keep things cool. Take your time - the low speed will make it take longer but by keeping things cool, you avoid work hardening the material into which you are cutting and you do less damage to your sharp drill bit.
 
I was thinking of clamping a piece of wood or metal to the piece I'm drilling that already has a hole through it to act as a centering guide. Will I succeed? :)

Once I get the right kind of bits, do I need a specific cutting oil, or can I just use a light (i.e. sewing machine) oil for cooling the bit? I plan on doing this with a hand held corded drill, so it's going to take some patience!

Finally (for now), I'm assuming there isn't a coating on good stainless that I need to worry about. The metal itself resists corrosion and drilling through wouldn't necessitate sealing the newly exposed metal, right?

Thanks for all the help!
 
I wouldn't use wood as a centering guide - it will make it impossible to get some oil to the surface and it will restrict the clearance of metal chips. Just use a good centering punch and one or 2 raps with a hammer. No need to worry about sealing the edges - the stainless doesn't have any extra coating. Also, pretty much any light oil will do. 3-in-1 is readily available and works fine.
 
Getting the final sized holes to line up will be the hardest part!

I'd go ahead and,

1) on the work bench, put the roller together with the pivot pin (bolt), then

2) using the most accurate method I could devise, find a position for the locking pin exactly symmetrically located on opposite sides of the complete assembly for the locking pin, then

3) center punch these two positions, and drill small pilot holes through both the first and second layers of stainless steel metal. Use oil, slow speeds, a sharp drill bit, and rely on pressure to make the sharp bit cut, rather than burning it up with high drill speed rpm.

( The next steps would probably be easier to done with the assembly mounted on the boat for stability, for safety, for a secure drilling position, and for ease of applying pressure, providing there is room for the drill to operate. If not, the roller can be mounted to a large board held in a vice. The bits must be kept perpendicular to the side surface of the anchor roller to allow the final holes to line up!)

5) check the holes for symmetrical location, then start to enlarge them with progressively slightly larger diameter bits. Smaller steps is easier and safer, too!

5) when you approach the locking pin diameter, get a drill bit slightly undersized and long enough to span across the entire width of the assembly. Drill each side out, then drill across the entire assembly from both sides. This will assure you that the holes will line up for the pin.

6) repeat step 5 with a full sized drill bit equivalent to the locking pin diameter.

7) put the pin in the holes and see what you've got! It should fit tight!

8) clean up the holes by taking the assembly apart and using a countersink to clean off the burs, but without changing the diameter of the overall holes. You may have to use the countersink with your fingers on the insides of the holes where the drill won't fit.

9) I like to use a push-button ball-lock pin in this type of application , and secure the pink with a stainless wire or nylon cord to something close by so it cannot be lost overboard. You can also use a standard clevis pin with a hole provided in the one end and a ring-ding to secure it in position.

I may elaborate later, but have to go for now! (Cants get the substituted emoticon for 8) to appear right!)

Joe. :teeth :thup
 
Hey Joe, excellent instructions. I think the most important mistake I could still make now is to forget to leave room for the heads of the deck mounting bolts and line up the holes with the roller tilted all the way up! I will try not to do that!

I'm looking for something to order to use as the pin. I looked on several websites for different combinations of terms (ball release pin etc.) and found things that look close to what I'm imagining, but none of them are 4" long which is what it would take to go entirely through the roller pieces. Most are like 2", or aren't stainless, etc.

Any leads/links to a place where I can buy a suitable pin? I'd like to get one *before* I start drilling holes so I don't drill the wrong size!

Edit: I just found them. The term is "Detent Ring Pin" and the "grip" specification is the length between the ring hole and the ball. Looks like something like this will work:

http://www.amazon.com/Aerofast-Inc-FPSC ... 293&sr=8-1
 
The AeroFast pins will work well. I own a drill press just for work like this--and carried it aboard all of my voyages in larger boats. (A C Dory does not lend to a stand up work shop in the engine room however!). I used a simple center punch, and a cutting oil--going very slowly, and keeping steady pressure.

For many of the bow anchors I use flat head screws, with an aluminum backing plate below the deck. The plate in the bottom of the roller is counter sunk, so that there are no screw heads or bolt heads pround of the surface of the bottom piece of the assembly.
 
thataway":1nkkxn3c said:
The plate in the bottom of the roller is counter sunk, so that there are no screw heads or bolt heads pround of the surface of the bottom piece of the assembly.

This one is a used "Simpson Lawrence" that I got on ebay for $55. It doesn't have countersunk mounting holes, just plain 3/8" holes. It's in much better shape and a lot sturdier than the one I took off the boat!

I think I'll get the 3/8" dia. by 4" grip pin.
 
You can countersink those holes yourself with a countersink tool.

Just don't make them too deep and remove too much metal, and also drill properly with oil, firm pressure, and low rpm.

Sometimes one does use up a drill bit or countersink, but they're relatively inexpensive compared to the hardware itself, usually.

If you have to because you can't find a just right pin, you can buy a stainless bolt of the right size, cut off the threads, round the ends off slightly, drill a small hole across the end, and add a ring-ding to secure it in place. You can also make a hole in the hex end to attach a seizing line to. Fun to make your own stuff, sometimes!

Joe. :teeth :thup
 
Back
Top