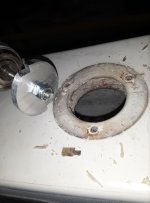
Potting screws - gauging balsa thickness?

Ctarmigan

Member
Hello all,

22 Cruiser preventative maintenance. I'm beginning the process of removing a number of items screwed into the hull and epoxy potting screws to avert dreaded water intrusion. I'm starting with brackets holding up the rear seat (containing the water tank) and under the sink/stove counter and holding the foot pump in place - the current brackets (galvanized?) are quite corroded, and I'll replace with stainless steel hardware. All goes well, I'll progress over time to other fasteners in the hull (e.g. screws in the retaining strip in front of the fuel tanks).

Putting Dremel to hull, though, is a daunting prospect. My question to others who have done this before: how do I gauge the depth of the balsa, and avoid chewing into (or through!) the fibreglass of the outer hull surface?

Thanks!

Oliver
 
When drilling you can feel the change in force required when the drill gets through the first side of the fiberglass and enters the balsa. You can also feel when it hits the FG on the other face of the panel you are drilling. Once you get through the first panel, just drill at slow speed until you hit the other side.

One trick is to use a bent nail. Drill the hole in the face panel, then put the bent finish nail through the drilled hole and use the drill to spin the nail. This will under cut the balsa under the FG pretty well. Use a vacuum to suck out the chewed up balsa and refill with epoxy. The bent nail will not penetrate the FG on the other side of the hole.
 
Both of the suggestions above are good. It is easy to feel the bottom skin with the drill bit after drilling into the balsa. I prefer the allen wrench for core removal in holes. Since it has a hex shank it wont slip in the chuck.

My boat is a 2003, so maybe the same as yours. The hull balsa is 1.5" thick. Transom is 1". V-berth and v-berth floor is 1/4". The gunnels are 1/2" and the roof is 3/8". Only the two lower 'steps' on each side of the roof are cored, the top is not.

For large areas like the lazarettes, fuel fills, windlass, ect you can make a simple tool from 1/4" alum and a 1/4" bolt and chuck it up in a drill.

20210108_213637.sized.jpg
 
I drilled out all the screw holes around the gas tank retaining strips in my 2005 Angler 19. I drilled one inch holes in the deck and then cleaned out any damaged balsa around the holes. It was very easy to tell when my one inch bit hit the hull under the balsa. I ordered three quarter inch round fiberglass rod and cut it into plugs that would fill the holes. I filled the holes with a generous amount of 5200 and then set the plugs flush with the deck. I replaced the tank retraining strips and set the screws into the fiberglass plugs.

You can’t see the plugs under the retaining strips and he strips are very solid. I am confident that water will not be an issue with this solution.

Good luck!
 
Super useful information (and great to know I may be dealing with up to 1.5" of balsa, though I'll proceed carefully nonetheless). Thanks all!
 
I would recommend removing any wet core material--or at least 3/16 undercut of the inner glass. Paint the balsa with unthickened and un diluted epoxy. You want the fibers of the balsa to have the epoxy to seal them. 5200 will not co it.

Then fill with the thickened epoxy. This gives your something which has a "bite" under the inner layer of the floor, and seals the balsa.
 
Back
Top