Hi Mike,
When I had this problem Dave Paxton aimed me at this writeup that he made on the Brat site on Feb 4 2006 under the topic Sticky Steering.
Rick
Dave's reply
Sudmargo:
Here's something which might be of use concerning your steering question:
Lubrication procedure for Teleflex steering on a 2003 CDory Cruiser, powered by Honda 90 of same year. This procedure might not apply to other setups. I’ve posted photos titled “Steering Lube 01-06”, on the C-Brat’s site under Outboards and Systems, detail photos, which begin on page 2. The link to that location is HERE.
There are three possible locations where the Teleflex steering could hang up: the mechanism behind the helm station, the cable from the helm to the motor, and the steering shaft at the motor. Only one of these – the steering shaft – is readily susceptible to lubrication. If problems exist at either of the other two locations, consideration should be given to replacing the entire steering unit, or converting to hydraulic.
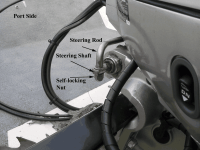
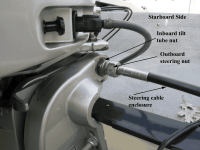
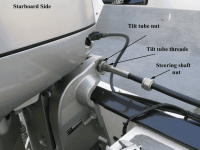
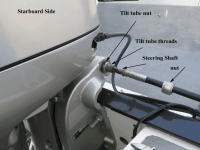
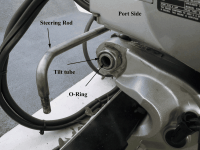
Photos 01 and 02 show the port and starboard side connections of the steering system, at the motor.
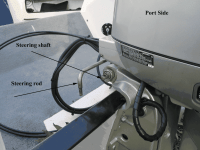
The port connection (photo 01) consists of the steering shaft, which comes through the large nut attached to the motor’s tilt tube, and the steering rod, which is the connection link between the steering shaft, and the motor. The steering shaft is an integral part of the Teleflex steering system, and the entire point of lubrication is to remove the shaft from the tilt tube so that it can be cleaned and re-lubricated. The steering rod attaches to the steering shaft with a self locking nut. Photo 01 shows the steering shaft fully retracted into the tilt tube, which is the preferred storage position because the shaft is then not exposed to the elements. The steering rod is disconnected from the steering shaft by removing the self locking nut on the bottom of the steering rod, turning the helm until the steering shaft is fully exposed, and then lifting up gently on the steering rod. If anything more than gentle lifting of the steering rod is required to remove it from the steering shaft, loosen the attachment of the steering rod to the motor steering plate, to avoid bending the steering rod. Photo 03 shows the disconnection of the steering rod from the steering shaft, now in fully retracted position. With this disconnection, the motor should freely rotate from full side to side, with light hand pressure on the motor cover. If there is any resistance, apply grease through the fitting located below the motor head, on the front side of the motor shaft enclosure. Use Quicksilver 2-4-c with Teflon, available from Mercury dealers. DON’T USE THIS LUBE ON YOUR TRAILER BEARINGS, OR THEY WILL FAIL. If lubrication doesn’t eliminate the resistance in the motor’s rotating freely while the steering rod is disconnected, see your Honda dealer.
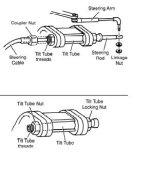
There are two nuts at the starboard side of the tilt tube (see photo 02). The inboard nut, closest to the motor, attaches the tilt tube to the motor housing. Remove this, and you are one big step closer to dropping the motor on the ground! That pretty much leaves the outboard nut as the one you want to turn. So, with a wrench on the inboard to keep it and the threaded portion of the tilt tube from turning, unscrew the outboard nut, as shown in photo 04. Here, the nut has been unscrewed, and pulled back several inches along the Teleflex steering cable. Grab the black steering cable, and pull the assembly directly away from the motor. Photo 05 shows the beginning of this process. Be sure that before you start pulling, the steering shaft is in the fully retracted position, and have a towel ready, because once the end of the steering shaft clears the starboard end of the tilt tube, it wants to lay back against the motor housing. Just wrap the towel around the end of the steering shaft once it is clear, and let it gently assume whatever position it desires. Be careful not to kink the cable while extracting the steering shaft from the tilt tube. It’s pretty stout, so long as just pull it straight back from the tilt tube.
At this point, you are ready to begin the lubrication process. First, remove the o-ring from the inside of the port side tilt tube nut. The ring is visible, and marked, in photo 06, and sits in a groove about ¼ inch in from the face of the nut. Be careful not to scratch metal while removing the ring. Next, clean the inside of the tube by using a wooden dowel to push alcohol soaked pieces of rag all the way through, from one side to the other. Continue until the rags come through clean, and then push a few dry pieces of rag through to remove any residual alcohol. Visually inspect the inside of the tube to confirm that no rag or other debris remains. Be sure to clean the groove in which the o-ring sits.
Next, use alcohol soaked rags to wipe off the steering shaft. If the shaft has deposits which can’t be removed by solvents, gently use 600 grit wet-dry paper and motor oil to smooth them down. Any hard deposits left on the shaft will greatly shorten the life of the new O-ring seal. Clean the shaft after any deposit removal.
Now, liberally apply grease to the steering shaft and into the shaft enclosure through the tilt tube. Again, use the Quicksilver product. DO NOT USE WATERPROOF TRAILER BEARING GREASE, per Teleflex technical. Replace the O-ring with Honda Part Number 91352-ZV5-000. You’re now ready to reinsert the steering shaft through the tilt tube. If necessary, turn the helm to fully retract the steering rod right up against the and of the cable enclosure. Grab the cable enclosure with both hands, push it straight back along it’s axis to avoid bending, and feed the end of the steering shaft through the starboard side tilt tube nut. Let the shaft feed through the tube, and then carefully extend it through the port side nut, being sure that the o-ring stays in place. Extend the steering shaft all the way, and then gently reattach the steering rod to the steering shaft, being careful not to strip the lower threads on the rod. Use a new self locking nut (3/8 – 24 UNF Self Locking, available from Lowes, but check visually to be sure the treads are the same) on the end of the steering rod, and retighten or replace the nut at the other end of the steering rod, if that was loosened in order to allow the rod to be disconnected from the shaft. Liberally grease the threads on the outside of the tilt tube shaft on the starboard side, and pack grease inside the nut attached to the Teleflex cable. Then, using two wrenches, reattach the Teleflex cable on the starboard side. Wipe away excess grease, but leave any in grooves which might help to provide a water seal. If you make this starboard connection before the steering rod has been inserted into the steering shaft on the port side, you’ll have trouble getting the hole in the shaft to line up with the rod.
During normal use, it helps to carry some Quicksilver grease in a little 35 mm photo canister, or whatever else suits your fancy. On a routine basis, turn the helm to fully expose the steering shaft, put on a surgical glove, and use a tissue or rag to wipe off any deposits before they have a chance to really harden, and wear out the o-ring. Then, put a dab of grease on your finger, wipe it along the shaft, and turn the helm to withdraw the shaft across the o-ring. As previously stated, the more you leave the motor with the steering shaft retracted, the longer the o-ring, and your maintenance efforts, will last.
Good luck, and smooth cruising.

