C-Dory 25 Deck Sole Hatch Installation

Yea, if I had to do over would have kept my 22 cdory and saved up for hewscraft. But could not afford one at the time and got a 07 25 ft cdory. Oh well can’t redo
 
jkswor":29e8aaiu said:
Yea, if I had to do over would have kept my 22 cdory and saved up for hewscraft. But could not afford one at the time and got a 07 25 ft cdory. Oh well can’t redo

Having owned both, your 25 C-dory is far better than any Hewescraft :wink:
 
I personally would be less willing to spend part of my remaining years down on my knees looking into some hole in the deck with mechanical and electrical problems in the dark abyss below. I'd look for a simple, easily serviced boat...

I would somewhat agree with the above input. Right now, at this point in our lives, the C-Dory works fine. It's large enough for the two of us, inexpensive to run (as far as boats go), is affordable as we don't need a slip and the boat/trailer is in our driveway & we had the proper truck to pull it already...

What will the future hold? Will we do a "Fred & Robbin" and up-size? Will we just get out of boating all together? Will our health inhibit us?
I'm just trying to improve our current boat and the wet bilge has always been an irritant to me. Anything stored down there gets wet, moldy, slimy...it a PIA. We have blown thru water pumps due to them rusting out, literally, until I mounted it next to the battery and got it up, out of the never-ending water. Changing/maintaining the batteries are also a PIA. The rest of our bilge is fuel tank and water tank. Hopefully, they won't need replacement.

Hopefully, this will cure the wet bilge issue once and for all.
 
tsturm":lpwnyets said:
jkswor":lpwnyets said:
Yea, if I had to do over would have kept my 22 cdory and saved up for hewscraft. But could not afford one at the time and got a 07 25 ft cdory. Oh well can’t redo
Having owned both, your 25 C-dory is far better than any Hewescraft :wink:
Hope your right. I have dropped $5000 in it since purchasing to clean it up and repair issues. Now I have to do the deck floor doors and the coaming to keep water out . Would like to not have to continually work on it.
 
Excuse me. jkswor, but you own a boat. Of course, you're going to work on it constantly. Consider yourself lucky if you get to use it between boat jobs.

Boris
 
Thanks Boris! I'm kinda anal.

I'm grateful you took the plunge first, though. Cutting into the boat is always nerve-wracking...your jumping in made me feel more confident that it would work. :beer
 
After shrimping last week I can attest these hatches work. The bilge was dry even after shrimping where I dumped gallons of salt water all over the cockpit to rinse it out, even after standing on them while pulling pots...even after washing the boat out at the dock & at home.

D.R.Y. 8)
 
Alicia and I were talking about what we really didn't like about the boat 1) holding tank could be larger so we could stay at anchor to at least outlast water supply 2) the leaking cockpit hatches. SO I've decided to tackle the cockpit hatches. Found this great write-up and information. My Great Lakes Skipper hatches came today. I have a couple of questions

1) ordered a tube of 5200 but also have 4000. Is 3m 5200 the preferred sealant for the new hatch frame?
2) I couldn't figure out the frame thickness and ordered 1/2" and 3/8" 316 stainless screws. Now I think I might need longer screws. The screw has 1/4" of threads once it goes through the frame. Is 1/4" enough to properly "bite"?

I can't remember how to post pictures but the below is a link to my photo album showing the screw

http://www.c-brats.com/modules.php?...ame=gallery&file=index&include=view_photo.php


modules.php


Screw_depth_1.sized.jpg
 
Bob&Alicia":1yb80tf2 said:
... The screw has 1/4" of threads once it goes through the frame. Is 1/4" enough to properly "bite"?
...

If you use 5200 or 4000 as a sealant, 1/4" of threads will be plenty. The sealant will be doing all the work. The screws just have to hold until the sealant sets.
 
ok, here we go. 3M 4000 is a Silane Modified Polymer and is easier to remove. 3M 5200 is a polyurethane and offers some structural benefits.

I used 5200 because I wanted those hatches to be as strong as the deck. Also I feel it seals the screws against seepage into the core. If you only want to lay a bead and don't care about the structural rigidity or sealing, use the 4000. I've used it to caulk around fittings which are bolted in such as the windlass.

Which brings us to the question of the 22 screws holding the hatch down. You realize that the screw only holds through the fiberglass and not through the balsa. So, you have 2 choices: through only the top layer of fiberglass or through both the top and bottom layers. As mentioned above the 5200 helped hold the hatch to the deck, so I only got screws long enough to go through the top fiberglass layer (there are 22 of them.). That said, once the screw is through the fiberglass to its full diameter, longer isn't going to help holding. I forget the exact length, but since the screw goes through the hatch and deck, I think I used 5/8" screws. I do know I got 316 ss screws from Bolt Depot, since the regular 304 screws rust on a wet deck.

There, I beat that to death.

Boris
 
Be sure that you route out and seal with thickened epoxy any exposed balsa core before you put the new hatch in place. You want to pre drill the pilot holes for the screws so that the area under these holes are part of the epoxy rim which you will form around the cutout for the new raised hatch. I have not done mine--I added more gaskets which helped, plus keep a slant back over the cockpit when the boat is not in use.

If you don't epoxy seal the core, and do the plugs there is always a worry that the core will get wet thru the screw holes as well as the rim of the hatch.

Boris used 5200, and I have also used 5200 with plastic hatches in the past. If you have to ever pull that hatch, it will be difficult. The sealant recommended for plastic and fiberglass together is Boat Life, Life Seal, which is a urethane/silicone hybrid. I used this for the new plastic access hatches on the fuel tank top, the bilge pump and the step access to the fuel lines on each side replacements. This has worked well there.
 
That said, once the screw is through the fiberglass to its full diameter, longer isn't going to help holding. I forget the exact length, but since the screw goes through the hatch and deck, I think I used 5/8" screws. I do know I got 316 ss screws from Bolt Depot, since the regular 304 screws rust on a wet deck.

I have 1/2 in 316 stainless from Bolt Depot. I could order some larger sizes just to be sure I have what I need. I was going to over-drill the hole and file with epoxy. From the sides I was going to route out as much core as I could and fill with epoxy. I guess I can route all the way back past the holes and if so I wouldn't need to over-drill.

I'll go with the 5200. I want the install to be strong and I don't want any water coming in around the frame so I was go to lay a wide bead so that it covers the width of the frame flange and goes down the side of the cut as well.

I would think that I would have all the holes drilled and lay the 5200 and insert the screws hand tight and let it setup a few hours until more tacky and then tighten the screws. I don't want to squish out the 5200. I do more with Butyl so not sure about tightening 5200 in stages or not.

As always, I really do appreciate the advice and help. I am excited about the results but nervous about cutting holes in the boat.
 
I would use 4000 or 5200 sealant and tighten the screws all the way to get a good seal (wiping up the excess that squeezes out). This will also seal the edge of the hatch frame to the FG. The 3M stuff does not work the same way butyl does.

Be aware, if you need to remove the hatches for any reason (say one gets damaged), 5200 will make the job harder. Not impossible, just harder. You might remove some of the gelcoat too.
 
Agree, tighten down the screws with the 5200. I usually tape about an 1/8" or less outside of where the sealant will be, so that it can be easily removed. Same for the top and most of the side of the new hatch--leave about 1/16 untaped, fold the tape over the edge, and then cover the rest of the rim of the hatch with tape.

Good on the epoxy--you can just pretrial the holes, and then route deeper, to get the size plug you need.
 
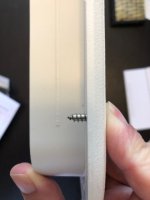
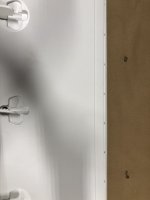
My new GL Skipper hatches have a slight gap on backside where hatch lid is not really flush around the edges. You can force the gap to close some but not totally. This leaves the screws partially exposed on rear edge when lid is installed. I don’t want another water issue so this concerned me. I can’t really tell from online pictures if this is normal and could get a reply from manufacturer Innovative Solutions.

For those that have installed is this normal?

(Can’t figure out how to upload pic with iPhone)

Thanks
Bob
 
Is this the photo?

81E52DDE_B751_481E_A6C5_8C75D81130D8.sized.jpg

Boris can tell you if this is correct or not--his photo looks like it may over lap some.

But did you seal the core, with epoxy, and and be sure that there was plenty of "beef" to screw into?
 
Yep that’s the photo. Thanks! The lid fits right along the frame on the front and sides but not the rear. I just have it dry fitted and even in the workbench can’t get the rear snug against frame. Maybe that’s the design??

I still have to drill holes and core it out. Was dry fitting it before I did all that.
 
I am going to install them. I would think they would fit flush all the way around but the gap is how they came from the supplier. They came in two parts but there is only one way to assemble them. I just have them on the workbench so there is no issue with the boat cutout putting pressure on the frame.
 
Back
Top