thataway
Well-known member
- Joined
- Nov 2, 2003
- Messages
- 21,690
- Reaction score
- 61
- C Dory Year
- 2007
- C Dory Model
- 25 Cruiser
- Hull Identification Number
- DOR25652A707
- Vessel Name
- thataway
I keep harping on the issues of deck moisture intrusion. Here is a good example and what to do to repair it. I wanted to replace the factory hatch with the ones which do not leak. I expected to find a little moisture around the screw holes....but not this! Thisaway is a 2006 boat, and was kept in Nothern Virginia its first 5 years. Remember this is not just a C Dory issue--almost all boats have this type of problem. It is not usually found at survey. But, any factory can prevent it with just a little extra care and work in the building process.
First photo is after the hatch is removed. The screws came out, and were well coated with silicone sealant, the sealant had come up into the screw holes in the hatch.
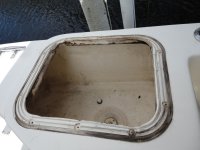
You can see that there is a perfect mold of the hatch under flange, that there is some gel coat painted over the exposed balsa core--but also that there is some dark balsa, suggestive of rot in the corners
As I put a knife blade into the areas from the exposed core to the screw holes this was soaking wet. The knife would go in easily up to an inch. This means that core is compromised and water has penetrated it, with mold growth:
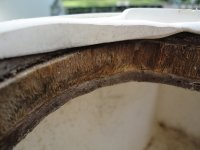
The core is cut away and the moisture extends back over an inch from the where the core is exposed in the cut out. The area behind the gel coat painted over the core, is also saturated!
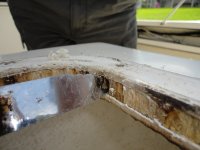
Here is the knife blade into the screw hole (already drilled out with 1/4" bit to get rid of any silicone sealant.
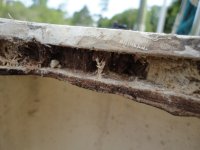
The above photo shows the rotted area cut out, and ready for drying. After drying, a Dremel tool will be used to cut it back further to good balsa.
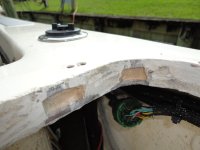
The above photo shows that on the Starboard side, there is little rot, and minimal water intrusion. The entire inner edge is painted with thicker gel coat-and peeling it back does not reveal moisture. Epoxy would have been much better.
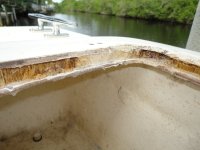
Above the photo shows the under cutting of most of the back outboard corner of the Port side. All of the gel coat on this side had to be removed, and all of the balsa was under cut, will be dried and then filled with epoxy and filler.
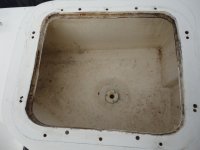
Above the port side has had the new holes drilled (5/16) and the outline of the new hatch penciled in. Note that the caulk is removed--after the epoxy fill, a Fein triangle sander will be used to remove the last of the silicone. (I used a chisel so far)
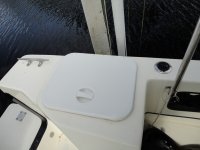
Above the new hatch is checked for position. The balsa has been dried with a heat gun and will be allowed to dry overnight before the epoxy filler will be put in place. All new screws will be put into the epoxy plugs--the balsa will be undercut where it is good--and where the balsa is not good, the entire void filled with epoxy and filler.
Stay tuned for the next installment--literally! I just finished "spring break" with the grand kids--which included a 7 mile canoe paddle, a visit to a prehistoric shark, a tour of the "Drum" and " Alabama" (ships), several days at the beach (with swimming), lots of pool time at home and a couple of boat trips both in the Caracal and C Dory 22.
First photo is after the hatch is removed. The screws came out, and were well coated with silicone sealant, the sealant had come up into the screw holes in the hatch.

You can see that there is a perfect mold of the hatch under flange, that there is some gel coat painted over the exposed balsa core--but also that there is some dark balsa, suggestive of rot in the corners
As I put a knife blade into the areas from the exposed core to the screw holes this was soaking wet. The knife would go in easily up to an inch. This means that core is compromised and water has penetrated it, with mold growth:

The core is cut away and the moisture extends back over an inch from the where the core is exposed in the cut out. The area behind the gel coat painted over the core, is also saturated!

Here is the knife blade into the screw hole (already drilled out with 1/4" bit to get rid of any silicone sealant.

The above photo shows the rotted area cut out, and ready for drying. After drying, a Dremel tool will be used to cut it back further to good balsa.

The above photo shows that on the Starboard side, there is little rot, and minimal water intrusion. The entire inner edge is painted with thicker gel coat-and peeling it back does not reveal moisture. Epoxy would have been much better.

Above the photo shows the under cutting of most of the back outboard corner of the Port side. All of the gel coat on this side had to be removed, and all of the balsa was under cut, will be dried and then filled with epoxy and filler.

Above the port side has had the new holes drilled (5/16) and the outline of the new hatch penciled in. Note that the caulk is removed--after the epoxy fill, a Fein triangle sander will be used to remove the last of the silicone. (I used a chisel so far)

Above the new hatch is checked for position. The balsa has been dried with a heat gun and will be allowed to dry overnight before the epoxy filler will be put in place. All new screws will be put into the epoxy plugs--the balsa will be undercut where it is good--and where the balsa is not good, the entire void filled with epoxy and filler.
Stay tuned for the next installment--literally! I just finished "spring break" with the grand kids--which included a 7 mile canoe paddle, a visit to a prehistoric shark, a tour of the "Drum" and " Alabama" (ships), several days at the beach (with swimming), lots of pool time at home and a couple of boat trips both in the Caracal and C Dory 22.
