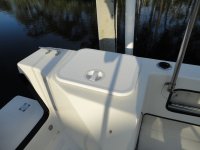
Deck core moisture and rot

The question is about the epoxy and what is necessary to keep it in place. I mix the epoxy and cabosil to a thick enough mixture that it will stay in place. It is peanut butter plus consistency. The reason we have not gone forward with this project is the problem of drying the core. We have had rain during the last few days, so it is cover with plastic--uncover, use the heat gun, expose to the sun, cover to prevent water intrusion. Hopefully in the next couple of days it will be dry enough to use the epoxy.

In the mean time I have put the basics of the 110 volt system in place. The previous system was a 50 foot extension cored, with 3 way splitter on the end, and two 1 amp battery chargers plugged into this cord. The new system has a "thru hull" male plug under the gunnel, a 20 amp fuse, an on/off switch, a plug for a 10 amp battery charger hard wired to the batteries, and one 20 amp/110V plug on each side of the boat, in the cabin. More details as it is finished.
 
Remember the lazarette hatches on the older boats? They had a coaming molded into the deck, and a solid, hinged, gasketed fiberglass hatch installed over. Everything was exactly color matched, they fit in seamlessly with the lines of that part of the boat, and they didn't leak. Their design physically limited how much they could possibly leak by providing a flashing/counterflashing situation. The factory decided to make the change (obviously to save construction costs) without making any construction modifications to account for the new pre-fab hatch installation. Heck, they didn't even select a hatch that was designed for horizontal installation! One of our members had to research and specify different hatches that were more appropriate, (which we had to buy and install ourselves) but the color still doesn't match. This is only one example of the many "changes" the factory made during that era. Maybe rather than putting so much of their resources into marketing and boat show afterparties, buyers would have been better served by having the factory put more of the budget into the boats themselves. An owner really shouldn't have to be rebuilding a lazarette installation and doing grinder work on so new a boat IMHO, and not all owners have the time and expertise that Dr. Bob has. This looks like "a grand" worth of work at a fiberglass repair shop. I'm encouraged that the current factory is reversing this trend somewhat by concentrating on build quality. Mike
 
Ok, lets get the photos of this project wrapped. It took several days to dry out the balsa core. I used a heat gun and exposure to the nice warm Florida Sun, then covered the hatches with plastic at night.

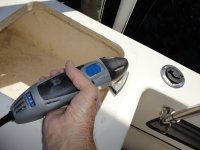
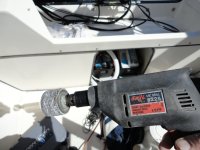
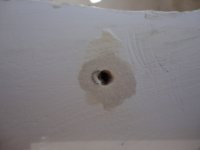
After dry, I mixed up the epoxy, with cabosil and medium density filler. I filled all of the areas I had ground out with the Dremel tool, and the drilled out the old screw holes with 1/4" drill, and the new screw holes with 5/16" drill bit. This allowed me to distinguish between the new holes and old holes. The epoxy mixture was pushed up into the screw holes from below. After it began to set, I sounded each hole with a small wooden stick, and then filled enough to give the hole an over fill over the top. Then sanded flush with the Dremel vibrating sander and sanded the inner part with a drum sander.

DSC00885.jpg

Sander removing any old caulk and sanding holes flush

DSC00888.jpg

Drum sander to sand the epoxy flush to edge of the glass

DSC00893.jpg

Life Seal by Boat life--proper sealant to use

DSC00894.jpg

Pilot hole drilled out

DSC00898.jpg

Masking tape to limit any sealant spread and new hatch screwed in place

DSC00940.jpg

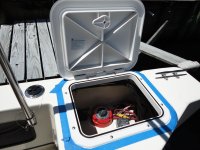
Hatch in place and dogged down--dry inside after "hose" test.
 
I just ordered a pair of Imtra Dream White 4000 hatches (PN SPA-40154). Hopefully they are the right ones!

I could only find 3 online retailers that had the dream white color. One of them had an apartment as the address, and no BBB history. The other seemed like a real website, but had an F on the BBB website due to various unresolved complaints.

Finally, I found and bought the hatches straight from the Imtra website for $95 each.

The boat's in the marina now, so I'm not sure how people feel about dremeling, sanding gelcoat, etc. on the water...
 
I did this project over the weekend, and it went pretty smoothly. I got lucky and had no moisture in the balsa, so I only undercut about 1/4".

One thing I did differently was to have the hatches swing toward the motor.

With the hinges facing out there isn't much gunnel surface for the hatch to lay flat on. Instead, it would try to open farther than 180 degrees and put a lot of stress on the hinge. By turning the hatch around, there's a couple of inches width of horizontal surface for the hatch to rest on when open.

The other thing that's kind of nice is I can easily open the hatch from the dock and check the battery switch.
 
I had considered switching the hinge position, but since we are opening it from inside the boat we retained the original configuration. I was also worried about hyper extending the covers, but it has not happened. Glad that your job went well, and no moisture!
 
thataway":wckmxocd said:
Glad that your job went well, and no moisture!

Maybe I'll take a look at the berth hatch next! That one looks a little more difficult to remove since it's sealed on the surface and also from below. But I've had good practice from doing the back hatches! I'd imagine it's a matter of cutting the seal from below with a utility knife or sharp putty knife, and then trying to pry under the hatch flange from above.
 
Hey Sean!

So many projects, I commend you but...

It's time to use the boat. You know how short Seattle summers can be. :D

Just funning' you. Have a great summer!
 
We've actually been out on the boat at least once a week since we moored it in the ship canal. Lots of trips through the canal and around the lakes, but we're itching to go out the locks. We were going to do a trip out 2 Saturdays ago, but the small lock had just been taken out of service after the Argosy boat crashed into it.

We have the gear to go out the large lock, but for whatever reason they wouldn't open it for over 45 min for us and another sailboat. Nothing happening in the lock as far as we could tell, so we just turned around and headed east.

It's just fun to be at the dock after work or in moments of free time. Working on the boat is more fun than working on the house!
 
Golerud,
We recently used these exact hatches on our 2008 Venture. Some holes even lined up but we had drill and fill some also. But the covers fit the existing cutouts perfectly. And they keep water out.
D.D.
 
I have a slight problem, I want to "Pot" the holes in the deck where lag screws have been used to secure the fuel tanks. My problem is that the holes go all the way through both the top and bottom layer of the deck composite into the void between the deck and the hull. There is an inspection deck plate but not enough space between the deck and hull to reach in to place something to block the holes to keep the epoxy filler in the hole.

I appreciate any and all suggestions or solutions.

Thanks
Gary
 
The old "bottomless hole" :cry

Couple of thoughts (without being able to see it):

1) Although there is not room to reach in (with hands?) from the inspection-plate hole, could you reach over there with something like long tweezers? or even a flat piece of bar stock? If so, then I would try to get something flat/rigid/adhesive over the bottom of the hole. If you are a bit careful when you pot them from the top, then it doesn't need to be anything too strong.

2) There is also the method where you fold up something that naturally wants to unfold and become flat, and tie a light string/line/etc. through the center of it. Then push the folded piece down through the hole until it clears the bottom and "unfurls" below, at which point you pull it tight against the bottom of the hole with the string (which is coming out the top of the hole), and then fill the hole, then later cut off the string.

For this one, if you could even get a stick or something in to reach the area from the inspection plate, you could help the patch to unfurl or stick in place.

3) I've read about people inflating something in or beneath a hole (say if you could get a balloon in there), or using but I've never used that method, and obviously if you inflated it in the hole column itself, then you would not be potting part of the hole. Clay or wetted out glass shoved down from above would probably create the same issue. Since there can be water under the cockpit sole (from what I have read), I would want to pot it completely.

When you wet out the hole (with neat epoxy), if you let that tack up (green stage) before going back in with the thickened stuff, then the thickened will tend to "stick" to the initial wet-out layer. This may help to keep it from "falling heavily" onto whatever you block off the bottom of the hole with.

Sunbeam :hot

PS: One last thought, if none of the above will work: You could go ahead with the wet-out, let it tack up, and then go in with slightly-extra-thick thickened epoxy and just accept that some will bulge out or possibly even drop beneath the hole. This would not be my first choice as it just seems messy and who wants an uninvited blob in the bilge (although maybe you could let it tack up and then get it out with a stick or something from the access plate hole).
 
I was thinking something like expanding foam insulation (not much!). Shoot a bit of that into the inner hole, letting it expand in the void and also up into the area you want to fill. After it hardens, re-drill to clear the foam from the area you want to fill, and undercut with a dremel bit if you want to. Then vacuum out the debris and fill with thickened epoxy.

Be careful to use a foam that doesn't expand too much, and don't use a lot of it. Just enough to seal the hole from the void.
 
This C-Brats site is wonderful, in just a short period of time after posting a question, you get great ideas and answers. Tomorrow I will build a mockup and try the balloon, unfolding paper and foam ideas. I think I can get a balloon under the holes closest to the deck plate but the other two holes are maybe 18" or more from deck plate and are close to the outside of the hull and the void gets even smaller.

Thanks,
Gary
 
All great ideas--but I would just put enough filler and glass fibers in the epoxy mix that it is like a pledget. Stuff this in the hole and let it go off. As Sunbeam suggests coat the sides of the hole and the under cut with thinner epoxy and let it tack up
 
Today I made a mockup and used the foam method and paper and string ideas and the expanding foam seemed to work the best. Haven't tried the balloon idea as I didn't get to the store to buy any. I didn't lose as much epoxy with the expandng foam as with the paper and string. I had to order a different hardener as the weather here has turned from the high 70's and low 80's to the 40's and 50's in less than 8 hours so the work has stopped for awhile.
 
If you do end up using foam for the repair, be careful since some types of expanding foam grow a lot and can apply significant pressure.
 
Back
Top