GOOD SERVICE - Fuel Tank Cleaned and Access Port Installed!

Pat Anderson

New member
It is important to share when you get good service - like Pete at West Coast Marine , Jesse at Bitter End Boatworks and Jim at Sterling Kayaks and Fiberglass. Now another one to add to the list - Devon and Kevin from PetroClean, which is a mobile fuel polishing service! They mostly do diesel of course but can also deal with water in gas, which was my problem.

At the end of August last year, I had a medical emergency at James Island (Dan and Tanya know the gory details, I won't go into them here) and we needed to boogie back to Bellingham as fast as we could. We are normally 6-7 knot cruisers, but we had the pedal to the metal on the way back, and that apparently mixed the water in the tank with the gas - we made it back but at home when I went to flush the engine, the big Racor fuel-water separator was completely full of water, no fuel visible at all.

So we knew we needed to deal, once again, with the water in the fuel tank. I got a recommendation for PetroClean from Pete at West Coast Marine. Devon and Kevin from PetroClean just left about an hour ago, I was really impressed with their service! Here is kind of a blow by blow:

First, they removed the fuel gauge sender unit and pumped all the gas out of the tank through the fuel gauge sender hole, and filtered it into big drums - the good gas into one and the water and gas into another waste drum. They ended up with about 50 gallons of good gas.

Next they put about 10 gallons of diesel into the tank so there would not be volatile fumes that might explode.

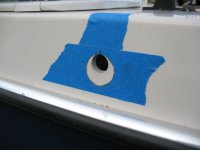
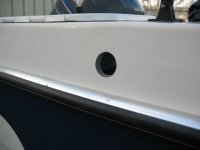
Then they cut an access port into the top of the tank next to the fuel gauge sender hole, here is a pic:
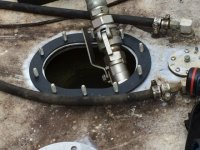
Fuel_Tank_Access_Port.sized.jpg

Then they vacuumed out the fuel tank, and hand cleaned it with absorbent paper. They actually did this before they put the access port hardware on. I looked in and the tank was absolutely clean and shiny. Devon said the tank was actually in very good condition, which was reassuring since more than a few CD25 fuel tanks have failed!

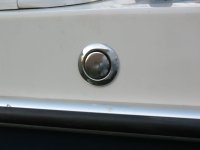
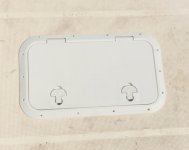
Then they pumped the good gas back in, again through a water separating filter. Finally, they fit the cover on the access port, here is a pic with the cover on:
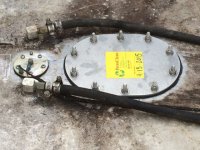
Fuel_Tank_Access_Port_Cover.sized.jpg

The little inspection port in the cockpit floor was never over the fuel gauge sender unit, and they recommended that I put a larger hatch cover over both the fuel gauge sender unit and my nifty new access port, so if I ever needed the fuel tank cleaned again, it would be quick and easy. That will be my next project before I put the cockpit floor back down and re-caulk.

PetroClean charges $100 an hour with a four hour minimum plus parts, so the total ding was $672, which was well worth it for my peace of mind! It took them a little over two and a half hours. They also disposed of the WAY old gas in the tanks of the CD16 Crabby Lou for no additional charge.

I also got a good look at the inside of a CD25 100 gallon fuel tank and the pick-up tubes, which are actually a couple of inches above the bottom of the tank.

We will now fill the tank with non-ethanol gas with Stabil. Their advice was for a boat that is used every season to keep the tank full, and only empty the tank if a boat is going into prolonged storage. I know there are different opinions about this, but this is what I plan to do, no more off-seasons with a half empty tank!

So, hope you don't, but if you need to deal with water in your fuel tank, these are the guys!


Looks like they did an excellent job! Interesting about the pick up tube being that far up, and the amount of water you had in the fuel!

You are good to go for at least 10 years now!
 
I use StaLube gas treatment several times a year to get rid of the water. No alcohol and does its job.

As a result, never saw any water in the filter bowl. Dirt & crud, no water.

Boris
 
Glad to hear they did a great job,nothing more aggravating then a botched job and having to take it somewhere else. Always good to go with a good rating from someone.
 
Great report, Pat. Now I know who to call to take care of potential problems with my dad's boat and fuel. He also has a diesel motor home with a full tank of fuel, 2 years old. I'm sure they could polish that, too. Not sure he would need the tank cleaned.
Wasn't getting through the sealant on the deck hatch fun? I did that last year and did a visual inspection of tank and cleaned exterior.
 
On the subject of water in the fuel: I don't know anything about how the fuel tanks on the 25 are installed, but on the 22's many of them came with a "curious" vent routing that put the vent basically right at the highest point when exiting the gunwale. I guess someone thought the higher the better. Unfortunately, this isn't true, and what happens is that the vent hose then creates a big "fun park slide" for water..... right down into the fuel tank!

My boat had the vents placed like this, and since I wasn't able to time travel and put the holes in the correct place (lower down so there could be a loop that would cut off the "fun slide"), I got around it by installing some Attwood vents that have a built in water trap (details in my Sunbeam ~ 22 Cruiser thread). I had to slightly modify the hole so that there would be room for the Attwood trap to clear the underside of the deck, but it wasn't too tough (just had to plan for it).

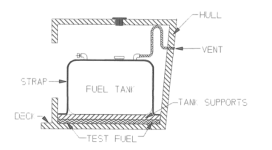
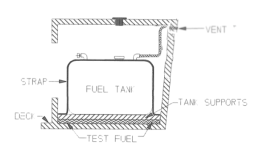
This may not be your issue, but figured I would mention it just in case. Here are a couple of diagrams to show what I mean (original courtesy of ABYC H-24). These show an above deck tank but it's the same principle for below deck tanks. The first illustration is the correct way (and puts the vent hole in the boat lower down to make room for the loop). The second illustration (badly butchered by me) shows how many C-Dorys were built with the vent exiting right up high, with no loop. This allows water to slide right down into the tank.

vent_routing.sized.png

vent_routing_high.sized.png
 
Wonder it that damn ethanol was the issue? I hate that crap, especially in my VWs (I use only dyno gas in all my small engines). They are not engineered to handle that and I have to go through the PIA of sourcing dyno gas and making sure I have enough. The difficulty is when I actually drive them; the tanks are only 10 gallons each, in both. Needless to say that limits my distance.


I love the gobment...not.
Rant over.
 
Sunbeams post brings up some good points. In my Tom Cat both vents were oriented so that the two small screened openings were pointing forward and up. Than almost guaranteed that rain and spray would get into the tanks. There are several choices, one is to put a cover over the vents, another would be to re-orient or replace the external vents, with a proper orientation.

My fuel pickups on the 22 are very close to the bottom, since I can get over 24 gallons into each tank, which is "empty" (I pump all of the fuel out of my 25 gallon tanks at the end of the season, especially if I had to use ethanol laced fuel, as in California, which basically has no non ethanol gasoline available, even at marinas.) I use my own system, which has a razor filter, sized for 30 gallons an hour, pumped by a automotive fuel pump which pumps 30 gallons an hour. Cost of the system:
$80 for the Racor filter, $35 for the pump, $15 for the 1/4" marine rated fuel hose. Total cost: $130 dollars. Recently, I had fuel stored in the Caracal Cat, and had not been able to use the boat for 2 years. (Non ethanol, treated fuel), and I ran that thru the filter system--zero water picked up. We live in a very high humidity environment; on the water in Florida.

I am not entirely convinced that the amount of fuel in the tank would be enough to cause a problem such as Pat has in his 25, and would want to examine if there is any way that water got into the fuel due to position of the vents.

In the 25 (at least the older ones--not sure about newest), it is very difficult to access the vent fitting, without cutting an inspection hole. There is already a hole in the boat, up high--where C Dory put the vent fitting, and it would be necessary to cut a new hole lower, and either put a cover over the original hole, or fill it.

There is another solution: Atwood makes a vent which does not allow water in, and can be cleaned from the outside:
Straight
23-660313.jpg
or one which has a 90 degree fitting and anti surge trap:
1684-FFVENT-PTRAP-RGB_mn.jpg


I don't know if the latter one is what Sunbeam put in, but this specific trap, will prevent fuel from surging out of the vent, when the tank is full (or close to full).
 
I put in a slightly different Atwood vent/trap, which has a very good water resistance rating (not saying the above ones don't - just what I did). I got the flush style that has a little cup, thus fits in a larger hole than the stock one. There was a reason...

On my boat I couldn't "just" replace the vents because there was not room between the underside of the deck and the hole for the trap/vent combinations. However, since the one I chose has a slightly larger hole, I was able to enlarge the original hole to make it work. I didn't simply enlarge it all the way around evenly, but instead did all of the enlarging "downward." This is what allowed it to fit under the deck (just). There is more detail and discussion in my thread at the following link (go to link and start scrolling down), but I'll put a few photos here too.

http://www.c-brats.com/viewtopic.php?t= ... c&start=30

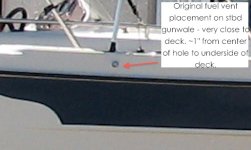
Bad shot of original vent. Too high up, no loop, nothing to really keep water out:

Fuel_vent_original_placement.jpg

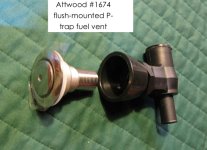
Here is the new Attwood assembly before installation, showing both the part that goes on the outside of the boat and the part that goes on the inside:

1674_vent.jpg

Here you can see how I enlarged the hole "down":

vent_new_hole_marked.jpg

New hole:

vent_new_hole.jpg

Done (of course I also installed new vent hose on the inside, but that's not shown here):

vent_in_place.jpg
 
Wow, a lot of thought has gone into the vents.

Pat's boat was produced about the same time Journey On, so I assume the vent position is the same; on the side, under the fill caps. Mine pointed down and aft and the backside is fairly easy to get to. It does require a LARGE wrench to loosen, and I got a suitable adjustable at Harbour Freight.
Just loosen some of the wiring, etc. that's going forward. I also wrap a little blue masking tape around the vents, just to keep the gas smell down.

So both of Bob's worries could be applicable to his 25 which was an earlier model. I also run Journey On once every 3-4 months and have never had a problem with bad gas. Just add the StaLube treatment to eliminate any vestige of water.

Boris
 
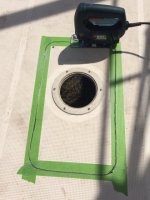
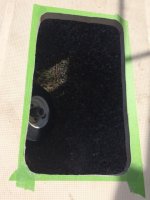
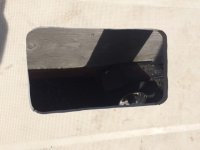
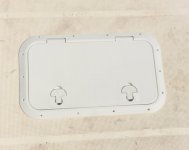
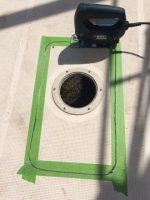
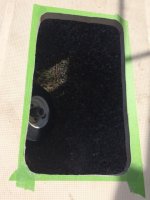
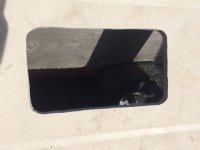
With the nifty new access port cut into the fuel tank, on the recommendation of the PetroClean guys, we are putting a new hatch in the cockpit floor to make future access the new port (and to the fuel gauge sender unit easy. In fact, the factory installed inspection port that should have been over the fuel gauge sending unit was over...nothing, just the top of the fuel tank. Here is how it is going:

Cutting out the hole for the new hatch:

Cutting_Hole_for_New_Cockpit_Hatch.sized.jpg

The hole is cut out:

Hole_for_New_Hatch_Cut_Out.sized.jpg

The clean hole with tape remocved:

Clean_Hole_for_New_Hatch.sized.jpg

And finally the hatch dropped into the new hole:

New_Hatch_Dropped_in_Hole.sized.jpg

Before bedding and screwing down the new hatch, I need to put something over the exposed core in the cockpit floor. Siggestions for what I should use are definitely solicited!
 
Pat Anderson":p4t67euv said:
With the nifty new access port cut into the fuel tank, on the recommendation of the PetroClean guys, we are putting a new hatch in the cockpit floor to make future access the new port (and to the fuel gauge sender unit easy. In fact, the factory installed inspection port that should have been over the fuel gauge sending unit was over...nothing, just the top of the fuel tank. Here is how it is going:

Cutting out the hole for the new hatch:

Cutting_Hole_for_New_Cockpit_Hatch.sized.jpg

The hole is cut out:

Hole_for_New_Hatch_Cut_Out.sized.jpg

The clean hole with tape remocved:

Clean_Hole_for_New_Hatch.sized.jpg

And finally the hatch dropped into the new hole:

New_Hatch_Dropped_in_Hole.sized.jpg

Before bedding and screwing down the new hatch, I need to put something over the exposed core in the cockpit floor. Siggestions for what I should use are definitely solicited!

I'd mix up some neat epoxy and paint it on the edges. Probably would use two coats.
 
I would rout back the edges of the core material, --especiall in the way where the screws will be put in place--drill screw pilot holes, and then cut back with a Dremel tool into these "slots" from the inside of the core. The reason that I don't agree with Roger's advice, is that you will have leaking around the screws into the core--and there will be rot around these screws, which will then spread into more of the core. I have been helping via on line, another C brat where just exactly that happened, and he has had to replace the entire cockpit floor.

The screws are the problem---even with some sealant as dilute epoxy--the core has to be sealed.

Although painting sounds like a good idea, this is a fairly good size hole in the cockpit deck, with folks walking on it, and exposed to moisture. This area is not supported right around it, so it can flex, and the epoxy can crack and not adhere to the balsa--especially when it gets wet.
 
Well, yesterday I bought my West Systems 105 resin, 206 slow hardener and the pump kit. I already had some 404 high density filler, I don't remember what I had that from. I first repaired the steps, routing back the rotten wood to good wood. I used an electric drill to drill a 3/8" holes from the side into the wood between the fiberglass and cleaned it all out with my Dremel. I should have taken a picture of this but I didn't. Then I mixed my West Systems stuff to "peanut butter" and used a little plastic putty knife to press it in and smooth it. I will take a picture of this before it goes back in.

There are 10 screw holes for the new hatch. I can see it would be very difficult to route out the entire area all the way around the cutout area with this technique and I would be back to LFS for another $150 worth of supplies but I think I can route back to (past) the pilot hole using the same technique. Bob, would that be sufficient?
 
Back
Top