How to conceal fuel tanks on a 1987 22' Angler

handmeawrench

New member
Hi there. BRAND NEW c-dory poster here...love the forums. Let me apologize if I mess up some terminology. I'm new to boating in general, so may not know my windlass from my poop deck.

Question...on a 1987 22' Angler, the fuel tanks are exposed at the rear of the deck, just ahead of the transom. I'm not sure if they all look this way, but it seems like it makes some sense to put up a curtain or something to conceal the two primary tanks and the kicker tank.

Just curious what solutions others have come up with. While a curtain would do the trick aesthetically, perhaps there are other options that add a bit of function to the form. From a "neat and tidy" perspective, it just seems like having them exposed is a recipe for wedging my foot in there during a fish battle.

Discussion and photos greatly appreciated!
 
Here are a few ways I've seen (on Cruisers but since yours is an '87 I think maybe that area is similar?).

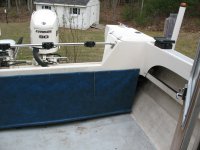
1) On some of the older ones (late 80's to sometime in mid 90's maybe?), there was a "curtain" coming down from the splashwell. Something like a heavy vinyl or Sunbrella. Could be two panels with a space in the middle for access to the area between the fuel tanks (if you have two separate ones).

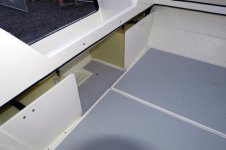
2) Then on the next generation of Cruisers -- I suppose when they switched from the rectangular, 18 gallon tanks held down by metal brackets to the more "shaped" 20+ gallon tanks that used cleats -- there were two panels made of Starboard™. These each covered one of the tanks and ran from the base of the tank about 3/4 to 7/8 of the way up to the spashwell molding lip (the tanks protruded forward of it so they could not run full height and have any place to tuck under). So there was a gap between the top of the panel and the splashwell lip.

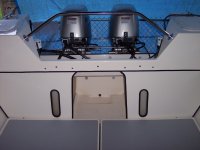
3) Then sometime around 2006 or so, the "shaped" tanks were changed so that they did not run forward proud of the splashwell molding, and then full-height, gelcoated fiberglass panels were used -- the top of the panel tucked under the forward lip of the splashwell molding and they were attached there and to the cleat ahead of the fuel tank at it's base.

In the photo albums there are quite a few photos showing the various styles of covers mentioned above (that's where I looked when I wanted to change my buckled Starboard™ ones to something else). I'll see if I can find a few that show the various styles and post them here for you.

So I'd guess that most folks just have what they have and don't (need to) make them -- although a few people have changed styles or modified the ones they have.
 
Some photos I dug up from various albums:

1) Here is an example of the "curtain" covering a couple of the Moeller 18-gallon tanks (they are sort of dark green rectangular tanks held down by metal L brackets that go into a recess molded into the tank).

cockpit_aft.jpg

2) And here is the partial height style in Starboard™. The forward face of these, slightly later tanks sits slightly forward of the splashwell lip, hence the gap at the top of the covers.

factory_floorboards.jpg

3) And a set of the full-height fiberglass covers, with tanks that sit back under the splashwell (again). The flat floorboards you see are removable, so the actual cockpit bottom is rounded like I imagine your Angler is (presuming it changed hull styles in 1987 like the Cruiser did? I'm not sure about that come to think of it).

Fuel_tank_covers.jpg

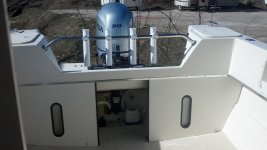
And a set on Glenda Jean, a brand new Angler (without the floorboards or the flat/permanent cockpit sole the newer Cruisers have).

New_Angler_covers_Glenda_Jean.jpg
 
'Sunbeam',

Thank you for posting these pictures. I have a 2003 22' Cruiser. I have the starboard type covers for my tanks, held by straps. Nice to see some better looking options-at least better looking in my opinion. Not many C-Dorys in my part of the country to take a peek at.
Regards,
Jack Howell
 
Thank you, Sunbeam and localboy. That's very helpful. It looks like my best option is to create a couple starboard panels (with viewing windows for fuel level - clever!). The link and photos were most helpful.

I'm relieved that this isn't a very involved project. This '87 needs a bit of TLC first, so I'm thankful for an "easy" project for once.

Cheers!
 
Not to take the ease out of easy, but just an additional thing you might want to check/take care of while you're in there (<--- ha ha, that insidious phrase).

(Pardon me if this is all old hat to you and I'm getting too basic.)

So, our hulls (and decks and transoms and some vertical areas) are made with cored construction. Basically, fiberglass is strong but floppy. To make it stiff you either have to make it really thick (heavy!), support it with something like beams or bulkheads, or use a cored panel construction. Cored construction allows larger unsupported areas and is relatively light. It's used a lot in fiberglass boats, although not all of those have cored hulls (ours do).

Think of it like a sandwich: The two bread layers are fiberglass, and the "meat" is either balsa wood, foam, or sometimes plywood or something else. On my boat all the core is balsa (vertical grain). I think most of the coring on 22's is balsa, although I think the pre-1987 boats used plywood, and some of the newer ones have foam in the transom. At any rate, it's all the same principle (not a physicist but as I understand it, once they are bonded together they are under tension and it works like an I-beam).

If the layers become de-bonded from each other, you essentially end up with three floppy boats, not one good one. If water gets into the core area, it gets trapped and de-bonding can happen (balsa can turn to mush, foam can de-bond, etc.). So, it's very important to keep water out of the core. How water gets in? Usually through a penetration of the skin made by a fastener or a piece of hardware. Sometimes fasteners, etc. are put in with "just" caulk and this doesn't tend to work long term, from what I have seen.

So, it's better to take stronger measures, I think.

An extreme way (which I use in some cases but not most) is to completely close out the core by removing it in something like a 6" diameter circle around the hold, and then re-fiberglassing to bring the "lips" of fiberglass together so there is no core (the boat is thinner) in the area of the hole.

The usual way (which I use for nearly everything) is to cut away the coring (by reaching/digging under the top skin with a dental pick, a Dremel bit, or some other method) for a 1/2" or so out from the hole, then fill the whole thing with epoxy (thickened, for strength), then re-drill the fastener hole through the middle of the new epoxy annulus (or if it's a larger open hole like for a rod holder, just dig out the same way then pack the edges with the epoxy - no need to fill the huge hole the rod holder goes through with epoxy just to drill it back out).

Back to the fuel tanks though: If you have the Moeller 18 gallon tanks they will probably have sort of Z-shaped metal hold down brackets that are screwed into the cockpit surface. Likely there will (would have been?) some caulk there but otherwise going into the core. So if it were me, this is when I would check those fastener holes out. And likewise, if I were making any new ones (such as for panel cleats), I would do them the epoxy way.

(If you find wet core around the holes, then I think it's best to dig it all out and repair. On my boat, a few of those holes had a little bit of wet core that came out with just a slightly larger drill; one was larger and I had to excavate a bit. If it gets beyond that point, then there may be some small fiberglass repair to do (because you can only reach/dig so far), but might as well not get into that unless you find something "more."

Sunbeam
 
Wow, great point Sunbeam.

I had previously done some reading within the forum about cutting back the core and using thickened epoxy to seal up holes through the hull for things like transducers. But it hadn't occurred to me to check out whether water has made its way into the holes of the fuel tank brackets. Great catch!

To me, it's definitely worth checking now as the boat is out of the water and near the shop. Caulk probably won't survive 25 years of use in the elements.

Thank you. You may have saved me some heartache later on.
 
Back
Top