How to make a vacuum power brake bleeder

Adeline

New member
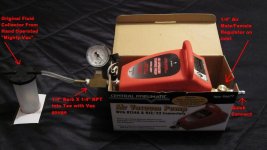
For years I've used a Mityvac to bleed my brakes but as many of you know all that pumping is a hassle. A while back I stumbled onto an internet article entitled "How to make a vacuum power brake bleeder". Basically, for under $20.00 you can assemble some parts and use your air compressor to provide the needed vacuum. Below is a picture of my finished project. If you click on it you'll be taken to the article itself. Brake_Bleeder_2.jpg
 
While a vacuum bleeder is good, I actually prefer a pressure bleeder. With the vacuum ones it is very hard to tell when you have gotten all the air out. Also, you are relying on the threads of the bleeder screws to hold the vacuum. This results in falsely thinking you have air in the system when it is simply leaking by the threads of the bleeder.

Here is an inexpensive bleeder system that can be made to work with the trailer brakes or any other brake system by simply getting a new lid for the master cyl you are working with and modifying it a little bit. They work GREAT. I have the K & D version of this system. When I bought it I didn't have time to make my own and chose to simply purchase it. It came with 4 different adapters for about $80.
 
If I can modify this vented cap
87478%201%20100.gif
I'll try the pressurized approach.
 
That is what I would do. I would simply drill the correct size for the NPT size of the fitting, and screw it on with some CA glue on the threads. The plastic should be strong enough to hold the fitting and the CA should keep it from leaking.
 
The challenge will be sealing the vent portals in the cap. If you look closely at the image above you'll see that it is a strange design with the vents arrayed around the bottom of the cap. This cap is what compelled me to go the vacuum route way back when.
What is CA Glue ?
 
What is this thing called "bleeding brakes"???? I have never done it - not sure I should screw around with it, but when / why / how would I want to do it?
 
What is this thing called "bleeding brakes"???? I have never done it - not sure I should screw around with it, but when / why / how would I want to do it?

Brake fluid is hygroscopic (readily taking up and retaining moisture).
This leads to corrosion and/or pitting inside the wheel cylinders.
This leads to sticking or dragging brakes.
A few years back i was heading North on I-5 after a brief stop at a rest area for a routine safety inspection. In my driver's side rear-view mirror I saw a cloud of blue smoke emanating from my left trailer wheel. I pulled over to the shoulder and watched it smoke for ten minutes or more. My wheel cylinder had stuck and my left side brakes were dragging. The hub had superheated, liquifying my wheel bearing grease and producing the cloud. This liquified grease ran out of the hub and formed a puddle under the trailer. It was a mess! I was very lucky to see the smoke and avoid a bigger catastrophe.
Brake fluid should be replaced regularly and these bleeders do that nicely.
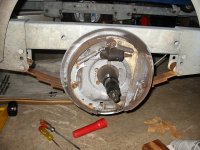
Here is an image of the Brakes on my EZ-Loader. They employ a "Uni-Servo" wheel cylinder with a single piston .
Here is a good descriptionIMG_1694.jpg of these things.
 
Adeline":1j46rqc5 said:
The challenge will be sealing the vent portals in the cap. If you look closely at the image above you'll see that it is a strange design with the vents arrayed around the bottom of the cap. This cap is what compelled me to go the vacuum route way back when.
What is CA Glue ?

CA is your typical super glue.


My bleeder came with an adapter similar to this. I ground down the edges of it to get a good seal on the actuator.

BTW: This would likely be less expensive than making your own and would work great.
 
Today I replaced my brake fluid and am happy to report the results.


The compressor is powered up and connected to the apparatus.
After breaking the bleeder nut free with a 3/8" brake-line wrench, I slipped the 1/4" vinyl tubing over the nipple. Opening the air supply valve on the compressor side of the apparatus initiated a nice steady vacuum(-15 in. hg) that sealed the vinyl hose to the nipple firmly. 1/4 turn on the bleeder started the fluid transfer into the collector vessel. At this point I got up and drank coffee while the process continued.

Totally hands off!

After a bit I closed the bleeder and then the air supply valve so I could empty the collector of the old fluid. Then I topped off the reservoir(at the surge assembly) with fresh fluid and repeated the process. Once I had clear fluid emerging from the bleeder I tightened it up and moved on to the next brake. That's it. The constant, relentless vacuum eliminated any possibility of air entering the system and relieved me of continually pumping away at a Mightvac as I did before. Unbelievably, I managed to complete this process without spilling even a single drop of fluid at the bleeders.

All in all the $20 was well spent. It made a messy and tedious job a much more pleasant experience.
 
Back
Top