Radar wiring - install help

krc

Member
Hi all -

I am looking at putting in a radar (1st Watch Wireless) and am trying to figure out how to add a switch so that I can turn it "on/off" from the panel at the steering area. SPST I suppose.

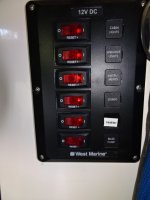
The front "rocker" switches next to the steering column are full, and so is the fusebox (12 fuses). But one of the fuses is for a cigarette lighter that I don't really need. Just not sure how to buy an on/off switch with indicator light (when "on") that I can mount next to my steering wheel near the trim tab indicator? Or can/should I just get a switch with a breaker (at 5AMP?) and not worry about the fuse box or cig lighter at all? (Really - does that even exist - in which case I would just pull +/- line?) Radar in-line fuse is 5A for radar, so I assume fuse / breaker would be 5A as well?

And to mount a new switch, what is the best way to cut into the cowling? Or, should I just replace the cig lighter with a push button on/off which might be simple as there is a hole already there, and wired already to fuse box with a 5A already in place...

Thanks for any thoughts/advice...
K
 
The cigarette lighter plug is really for accessories, like USB. chargers, or spot lights, etc. I have a number of them around the boat--sort of handy. For example we plug fans into them: An extra light, Battery charger for rechargeable AA or AAA batteries, etc. We have a fan which fits over the forward hatch, and run it off the console plug.

I find that I always add more switches and circuits to the boats I own. I usually put in either a complete second panel or add individual switches. I usually take out and replace the 6 fuse box with a 12 fuse box. Or you can add a second 6 fuse box. Another option which I have on the current boat is to drill a series of holes where the console fiberglass is only about 1/4" thick and put toggle switches in directly thru the glass You can find toggle switches which are all types, with and with out lights, etc. For example I have a series of 5 toggle switches which control the LED red night lights thru out the cabin and cockpit down to the inboard side of the console. Check to see where there is plywood cored area. If you cut out there, be sure you can easily get to the back of the switches, if putting in a second panne. For my radar, I repurposed one of the switches, and used a black label tape with white letters over the original "name" of the switch. I have one switch for all electronics except the radar. I don't want the radar on when I turn on all of the other electronics. Yours will be the same.

Yes, you need a single pole single throw switch in the positive wiring. I would fuse it before the switch. 5 amp fuse is correct.

My radar is also wireless (RayMarine Axiom +, but goes to the MFD first then to the I pad). The Furuno First Watch will be interesting to see how this works.

All you have to do is run the proper sized wire, I always use duplex wire in the white vinyl sheath, and keep the factory wiring to a minimum, especially if run thru tubing such as a radar arch. If you are just going with a short strut and short run over the forward cabin top, there may be enough factory wiring. I would put heat shrink over the double wire where it goes thru any holes or devices to prevent water intrusion. Use adhesive lined heat shrink ring and butt connectors, make the crimps with a good ratchet crimper. Label all wires as you go, and this may be a good time to label the other wires which are already there.

Put up some images of your installation and the radar picture when you get it all done.

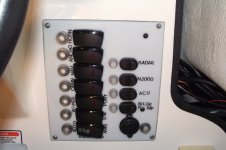
Here is a photo of the extra panel I added to our last 22:

DSC01736.jpg

Here are the 5 toggle switches just thru the fiberglass 1/4" thick
DSC00419.sized.jpg
 
It seems like simplest way would be a toggle switch as you show and simply wire it to a new fuse box (since my 12 fuse box is full). That way I keep the cig lighter ( I have another next to it as well), and have fuse space for the future.

Can I simply wire the new fusebox in parallel to the old one and so just pull power across? Fuse would be only 5A so not much extra load (to match the in line fuse at radar). Not sure what the fuse size is for the run from the battery up to the dc panel....
 
Upside down it appears. Shows how much they care.
:)

Curious- why do people use separate fuse blocks with panels that already have breakers or fuses? I can see if a breaker panel then may be you want a fast acting fuse (non-mechanical) - but otherwise why don't people just use panels with integrated fuses? Troubleshooting ease is maybe why?
 
krc":4jp584ef said:
It seems like simplest way would be a toggle switch as you show and simply wire it to a new fuse box (since my 12 fuse box is full). That way I keep the cig lighter ( I have another next to it as well), and have fuse space for the future.

Can I simply wire the new fusebox in parallel to the old one and so just pull power across? Fuse would be only 5A so not much extra load (to match the in line fuse at radar). Not sure what the fuse size is for the run from the battery up to the dc panel....

Yes you could use a new 6 fuse box. I prefer to keep the fuses in the boxes, because there are far easier to identify. Unless the fuse is right at the beginning of of the factory wiring, I will remove it, and just use one of the Blade ATC fuses.

Single toggle switch-put it in a place where you may easily add others in the future.

The small panel would also work fine.

You can parallel the input (red) into the old fuse box and new. There should be a 30 to 60 amp breaker by the house battery. Unfortunately the factory wiring is not always adequate. I usually will add additional wiring (both positive and ground). Different years have different size. You should be easily able to check the size by looking at it.
 
After removing some items in my 25, I had several switches left over. However, before that, I had installed some other electronics that I wanted switched, so added some cbs and switches just to the right of the main panel. I actually put in a whole new switch panel in Midnight Flyer. But here's one photo of C-Traveler for an idea.

IMG_8851.jpg

Here is a photo of Midnight Flyer with the new switch panel. I used some starboard or like material that I planed down to 1/4" or so.

DSCF0009.jpg
 
I very seldom use my present 21 year old JRC radar, but when needed I want it to work & concerned now that it might not, so where I already have iPads & iPhone this looks like a good cheap replacement, that should work well enough for us. Ordered a Furuno 1st Watch Wireless Radar from Hodges Marine today for $907 with free shipping. It should be a fairly simple swap out process.
 
Great! Are you re-using your current radar mount? I am probably going to just use a wedge as I want to get as much under bridge clearance as possible as I boat a lot in the delta.
 
I looked at mounts but really want to keep this low on the roof.

Anyone try using something like Azek (a PVC based material but supposedly weather resistant as it is used for exterior trim?) to form a base? I am a bit worried after looking at the boat yesterday while out fishing that there is a curvature across the top. So, I figured I could scribe the curve to a board and replicate that onto Azek and build up a small 1.5" high base. That way the top would be "flat."

I figure I would bolt through the azek to the radar from inside the cabin. Should i use 4200 to seal the PVC to the top? I am thinking then of putting some epoxy into the hole as well as I bolt thru (I am not sure if this 2006 is cored or not).

What about the wires? I see in other posts people saying silicon, etc.. but I was thinking about installing a gland. Something like a multi deck seal from scanstrut. This way I can also move my light behind the radar (just for aesthetics - I think radar would see through the thin pole fine) and route both wires through the gland.

What is used on the interior to route the cable within the cabin? Looks like some generic cable holders were screwed into the side for other cables, but I was wondering is an adhesive type cable holder would be better?

radar just came in so I got to get started on this soon. Just ordered a couple of lighted rocker switch that should fit near my trim tab control. [/url]
 
I mounted my radome right to the roof. I made some round spacers (2” hole saw) out of 3/4” hard nylon plastic (or pvc board). I glued several spacers together to raise the rear a bit higher, and only used one spacer on each of the front bolts. I ran the cabling right thru the roof and sealed with silicone or 4200. No leaks. I also have my mast light just behind the radome and haven’t noticed any issues with the radar picture. Those wires are ran with the radome wires. Inside I placed a cable clamp on one of the radome bolts and also either glued or screwed some various cable ties or clamps to hold the cable. Both my 2007 22 and 2009 25 have core in the roof. The 25 is a little thicker but I can’t remember the depth. I’m pretty sure you’d be fine with a 3/8” or 1/2” screw holding a small cable clamp.
 
The core or no core in the 25's have varied by year. My 2003 did not have core in the raised top, and it was "weak". The current 2007 25 seems to have core.

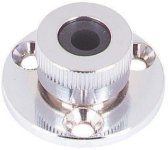
I like to use "Cable Clams"
540740.jpg
. They will allow you to use a plug, like on a transducer cable, thru the hull, and yet have a tight seal on the cable.

Shakespeare makes theses glands:

Shakespeare-4184.jpg.

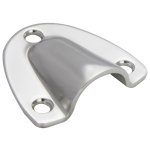
On some occasions I have used Clam shell vent covers where there were several cables:

heavy-duty-vent-2x2-clamshell.jpg

Silicone is not the best sealant to use. 4000 does not yellow as some do. Another good sealant is Boat Life Life seal, which is a hybrid.

Definitely seal any core, If core is present route out the edge and fill with thickened epoxy, after treating the balsa with neat epoxy.
 
Since you have the same radar, are you cutting the power line connector that is coming off of the radar itself? I didn't see any clear directions anywhere on taking off the connection that is attached to the radar itself (seems to go through some sort of rubber grommet). the connector is way to big for me to want to put that size of hole in the roof... So figure I am just getting rid of the round "connectors" that attach from the radome lead to the provided power line. What are you doing on your installation?
 
I used this cable clam from Hodges Marine. Blue Sea Cableclam W/Stainless Steel Dress Cap - 1.40"
SKU: BLU1003100

The one it’s replacing is identical except for the stainless covering & has been on the boat with the old JVC radar for 20 years. In removing the old I noticed the hole had not been epoxied, but no water had touched the roof coring, so these clam shells do work well. The boat is outside here in Wyoming on a trailer during the winter & covered with a tarp & in the future, I want to easily remove the dome during the winter to remove the strain of snow on the top of the tarp from it & the clam shell & quick disconnect makes this easy.

If I was to cut the cable it would be to remove a section of the 45 feet between the plug from the dome to the power & off/on switch connection. The instructions say not to cut, so don’t think I will.

Jay
 
And the clam was large enough to accommodate passing the connector itself through? I think for this cable it is okay to cut as it is power only and not transmitting and of the data where tuning may have been required. Another benefit of wifi.
 
Yes, plenty of room for cable & the quick connect/disconnect & the clam shell comes off & on quickly too. I may go ahead & cut about 40 feet off the cable.
 
So, radar is installed. Ended up being more work than I thought - mainly because I had to remember to bring all the right tools needed when I went down to the boat (about 30 min from my house). I used starboard to create a base that was large enough to fit the radar, and set the base to a 3.5deg slope. Maybe I should have gone 5-6 deg in retrospect - but it seems fine.

I installed a lighted switch for the radar that included a 5A fuse required by furuno. I did cut off all the connector ends and simply directly wired to the switch. I did leave another 10' or so coiled up in case I want to move radar to the aft in the future. I used a gland provided by seastar (iirc) that lets you drill more than one cable through the gland. It is not a split gland, however.

Took way more time than I expected - I figured this was a 1-2 hour job but it was more like 6-8 - mainly because of getting/remembering the right tools, finding parts last minute at ACE, etc... Starboard was picked up at Tap plastics and then I milled the wedge on my table saw at the 3deg angle

Photos are in my album.

Question: I left the anchor light in front of the radar. I am able to hook to my ipad and it "seems" to work but it is in the berth and so I need to take it out - hopefully this weekend - to test it out. Is the anchor light going to be okay in front? I have read mixed views on this... I do have a replacement anchor light, but hesitate to drill another hole in the roof, wire it down to the switch at the console, etc... Seems a lot of work if the current anchor light is "ok" in front of the radar.

Once I get it out on the water, I will get some pics of the ipad, etc...
 
Back
Top