Relocating electrical

Joined
Aug 19, 2025
Messages
9
Reaction score
0
C Dory Year
2000
C Dory Model
22 Cruiser
Does it seem doable for someone with limited electrical knowledge to relocate the electronics from in the starboard rear hatch into the cabin under the sink? I would like to install the battery selector under the counter top. Thanks!
 

Attachments

  • Screenshot_20251026_173718_Gallery.jpg
    Screenshot_20251026_173718_Gallery.jpg
    457.4 KB · Views: 13
This is possible, but there are a few decisions to make ahead of the project.
1. Are you planning on moving the batteries forward into the cabin? At a minimum they should be AGM type if they are in the cabin.
2. You want to have the least amount of cable distance between the battery, battery switch and outboard connection point.
3. 12 volt DC voltage drop is a real thing, so it must be part of the project plan.
4. Plan on using #1 tinned copper (or bigger) from the battery selector switch to the junction point powering the outboard. Take measurements and have the cables pre made with the right crimp lugs installed.
5. All existing wiring needs to be traced and identified as to what it is powering or grounded too.
6. The condition of the existing wiring is important, corrosion or discoloration of copper exposed to saltwater may require new wiring.
7. In 12 volt marine wiring, all grounds should go to a single point connected to the battery negative terminal.

If you are going to leave the batteries in the back and run the cables to the cabin disconnect, they will have to be really big because you are doubling the distance of the wire run.

On my boat, the AGM batteries are forward and near the battery disconnect. I ran #1 tinned copper 8’ or (16’ round trip) to a connection post with the 90 horse Honda outboard. The motor spins and starts effortlessly. That means the voltage drop is negligible.

Hope this helps you with an assessment on taking this project on.
 
Flashyfish gives you excelent advice. I will add some:

The main battery cable to the accessories should be fused within seven inches of the battery according to ABYC standards. There are exceptions, but your plan does not meet those criteria. The motor start circuit is exempt--however with this long run I would not be comfortable with the #1 cable not being fused. You would need a 500 amp fuse to carry the starting load.

There are ways to remotely turn the batteries off from the cabin involving relays--but it will be more expensive, and complicated. I don't see any reasonabe way to move the main battery switch except as above.

However you can and should certainly move that terminal block and all of its associated spaghetti up forward. There appears to already be a 30 amp to 60 amp breaker near that switch. It can be cleaned up a lot and that breaker used on the wire connecting to the consol.

Take a #10 tinned positive and negative wires from that breaker (unless you have a windlass in which case I would use # 6 wire) running from that breaker to a common fuse block behind the console and do your distribution there. That is the way the boats are factory rigged.

What is the purpose of moving the switch to inside the cabin? You can put it either in a concealed place if that is your plan, or on the outside of the side wall of the splash well, if you want to make it more convient.
 
It's a good opportunity to do some research and learn how your boat electronics are powered.

Use a DC wire gauge calculator, and remember the wire length is the total pos+neg length. You can account for the voltage drop by calculating the correct wire gauge without guessing or spending too much on excessively oversized wire. http://circuitwizard.bluesea.com

I rewired my starter battery, switches, and added lithium house with a DC-to-DC charger last year. So far so good. The following tools and components came in handy:

1. Heat gun for heat shrink.
2. Hydraulic crimping tool for battery lugs if you build your own cables.
3. Crimping tool for various wire terminals and connectors.
4. Clamp Amp meter. (Use this to identify the actual amp load before starting and to troubleshoot.)
5. Ancor wire, battery lugs, adhesive lined heat shrink, and adhesive lined heat shrink connectors/terminals.
6. Zip ties.
7. Battery fuse block. Keeps the main fuse as close as possible to the battery.
8. Blade fuse block. For select accessories that are 24x7...like bilge pumps, Wallas stoves, Scotty outlets.

Ancor brand wire and components are expensive but are good quality. I suggest sticking with Ancor rather than online generics.
 
Lots of good info in the other posts above here. I recently we-wired my whole boat and found the following resources very helpful:

Boatowners Mechanical and Electrical Manual by Nigel Calder

This book pretty much explains everything you need to know and gives good perspective on the ABYC standards.

The entire "MarineHowTo" article database (especially "how to make your own battery cables)
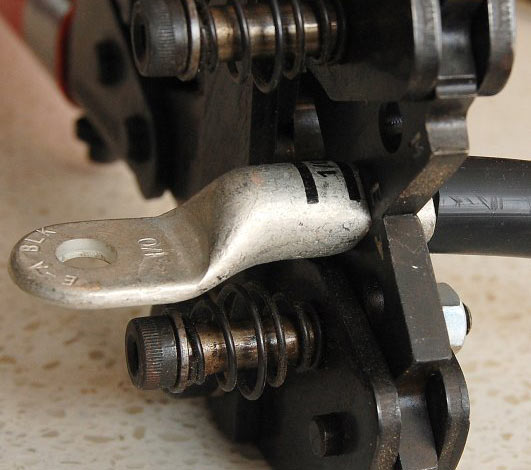
The articles here are super thorough and have great tutorials with suggested tools etc. I went with all heavy duty lugs and a giant crimp tool he suggested.

Blueseas has some good articles and a very helpful cable sizing table (also in Nigel's book)


Make sure you buy good quality marine rated wire (individually tinned strands). Figure out the amperage running through each cable, the tolerable voltage drop, and the cable length (full circuit to load and back) and the table will tell you what size cable you need. .

I used a lot of ancor marine cable and also found https://gregsmarinewiresupply.com/ to be a good source for the thicker cables.

Crimp connectors that have adhesive lined shrink tubes (along with a quality crimp tool):

Ancor 320101 Heat Shrink Terminal/Connector is the set that I used.

For routing your cables, I really like the Weldmount system since you can create nice anchor points for your cables without drilling a bunch of holes in your boat:


Make sure you buy their glue as well (very expensive but you only need a very small amount per fastener). It is methacrylate based meaning it's very tolerant of poor surface prep and is thick enough where you can just stick on the little anchor and it will stay in place while the adhesive cures. One additional thing I noticed is that these are great for hard-to-reach places and when you run your cable to them, you can use the WM twist off zip ties to do the whole install and "cutting" the zip tie one-handed.

Finally, while you are going through it, it's worth taking the time to label your cables, there is a good article on the "marine howto" section. For the big cables, a label maker and clear shrinktube, for the smaller cables, there is a great direct to shrink-tube printer:

I think you may find this is not a very hard project, you just have to take your time and check every cable for proper size, then wire it all together. In the end you will know your boat and will be able to troubleshoot if any issues arise on the water.
 
You also need to consider that if you bundle wires together, you will need to use larger wire sizes because bundles don't dissipate heat as well as single wires. Most wire size calculators allow you to specify the number of wires in a bundle when computing the proper wire size for your application.
 
Back
Top