SO WHAT DID YOU DO WITH OR ON YOUR C-DORY TODAY??

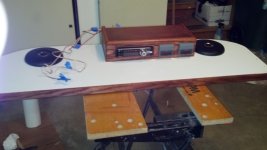
This weekend I started a re-build of the electronics shelf. I took down the old shelf and unwired everything that was connected to it (stereo, speakers, two blue seas systems V/Amp meters, VHF etc). I cut a new shelf and started on a new box to mount on the underside. This box will hold the stereo and the blue seas meters. Moving them under the shelf will make the stereo easier to read and it will free up the top of the shelf for other uses. I also moved the stereo speakers back several inches. The box is about 1/2 down. After that's finished, I need to build some boxes around the back side of the speakers to improve the acoustics. Then I will finish off the front of the shelf with either a fiddle or a door.
 
Well after an hour here and there over the past few weekends, I finally managed to finish the electronic shelf re-build and install.

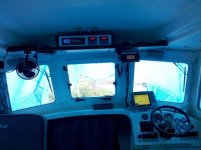
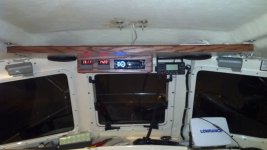
The shelf when I bought the boat looked like this.
Helm.sized.jpg

In addition to the way it was constructed (particle board, less than great carpentry), there were several things I didn't like about this. 1) the box on top of the shelf housed a lot of electrical connections but none of them were accessible without dropping the entire shelf. This made it a pain to swap out the stereo, to add new 12V outlets or to troubleshoot electrical issues. 2) The speakers were unprotected and didn't sound so good being open on the back side. 3) The shelf wasn't usable for anything else since the box and the speakers took up the usable space and the teak strip on the front was flush with the top of the shelf (as opposed to being a proper fiddle).

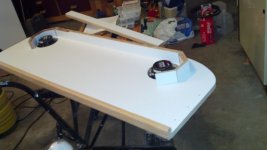
So.... I constructed a new shelf fron decraguard that I bought from old growth Dave awhile back. I made a fiddle from 1x2 oak stock by rounding over the top and dado cutting a notch out to fit on the shelf. I moved the speakers back and built speaker boxes around them. Here's the start of the speaker boxes.

ElectronicShelRebuild04.jpg

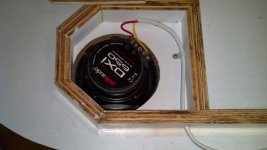
Speaker box detail.
ElectronicShelRebuild05.jpg

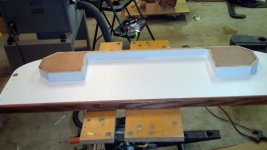
Speaker boxes all closed up.
ElectronicShelRebuild07.jpg

Electronics box attached and closed up. Old speaker wires still attached to stereo (removed those later).
ElectronicShelRebuild10.jpg

Shelf installed with the VHF now attached. Everything wired back up and working.
ElectronicShelRebuild12.jpg

With this setup, I can replace the stereo or speakers without dropping the entire shelf. I can also access the 12V wiring in the box by unscrewing 4 screws that attach the panel to the bottom. I also have a shelf that is usable for other storage. The box is set back 8" from the front edge and all edges and corners are routed down at a 45 degree angle (in case someone knocks their head on it).

Now I just need to attach the holder for the VHF mic to the starboard side of the box and wire a 12V outlet into the port side. Then it will be on to installing new fans to keep the front windows clear. More images can be found in this folder
 
I spent more time working on my berth ventilation project. I'll update the other thread on that once I get the photos uploaded. I also spent a hour or two this evening downloading pdf manuals for almost every piece of equipment on board. The hard copy manuals were all on board when I bought the boat but they take up valuable space, add weight and are harder to search than pdfs. Since I always have an iPad and/or computer and/or smartphone on the boat, I've decided to put pdfs for all equipment on each device. I couldn't find a good manual online for the Wallas 85DU so if anyone knows where to get one, let me know.
 
Replaced the water pump and thermostat in the Honda BF75 today. In the last couple months have installed the Dickinson propane heater, Standard Horizon AIS/DSC VHF, Garmin 740s chart plotter and Garmin radar. Have plans to mascoat the v berth yet this winter. Looking forward to spring boating season. :)
 
Sunbeam":3vsg95wn said:
rogerbum":3vsg95wn said:
I couldn't find a good manual online for the Wallas 85DU so if anyone knows where to get one, let me know.

Are these useful?

http://www.c-brats.com//files/wallas_85dp_85dp.pdf

(Above posted by JKIdd)

http://www.c-brats.com//files/wallas_85 ... c_2011.pdf

(Above posted by Scan Marine)

Sunbeam
YES - Thanks much - don't know why they didn't show up in a general search of the internet. I should have though to search here.
 
Nice idea and nice work Roger. I converted all my manuals to digital form a year ago, putting them on the IPad gave me more new room than I had expected and I can carry manuals for everything on the boat.
 
Drained the water from the system (electric pump, tank and tubing), and flushed with RV antifreeze and then put in 2 new, fresh gallons for the winter storage. (Think spring sooooooon :hot :D

Harvey
SleepyC :moon

Desktop_Picture.thumb.jpg
 
rogerbum":1hvemk0k said:
YES - Thanks much - don't know why they didn't show up in a general search of the internet. I should have though to search here.

You are totally welcome. The funny thing is, I found them by searching the general web for "Wallas 85 manual," and the first hit pointed me back here to C-Brats :mrgreen:

I debated about whether to bring all my paper manuals along with me traveling. There wasn't really a "good" reason, as I have downloaded copies of them to my computer, but.... it is nice to spread out a paper manual sometimes, and too, there is just something satisfying about having a neat stack of original manuals. Ultimately though, when packing a small boat/vehicle, I decided it was not that satisfying (but I saved them of course).
 
Since it's the new year, and because we generally don't do any boating during the winter, I did the following today:

-drained the water tank
-drained the water heater
-ran pink anti-freeze thru the water system
-flushed and flushed and flushed the head using the macerator pump, until only clean water emerged (not a pleasant job, but it could be way worse)

With our battery switch acting up I was interested to see what would happen if I did not turn it "on" and ran the pump. The pump pulled so much power that everythinge else went dim. That leads me to believe the switch is just corroded; it's getting some voltage thru but not a rull 12v. I'll take a look at it next weekend after I watch the Seahawks destroy the Falcons.

On another note, I am always amazed at the amount of "green" this state produces, and I don't mean money. I powerwashed my entire driveway last spring and the damn thing is green again along w/ the Sunbrella boat cover. Sort of a mixture of dirt, slime, mold and algae. I'm glad we painted our house green!

:wink:
 
Took the boat out twice in the last week. Love fishing in the winter. Its not crowded as all the Whoosie have winterized thier boats for the year. We did not get any fish. One day I had a nice king on and lost it to a seal. next day no hits at all. but I did get to use my radar as the fog near everett was really thick. Vis was down to 100 ft. Glad to have radar and be able to see the other boats around me, both of them. I would not have been able to do it with out the radar. Fog was so thick that you could not tell you were turning.

Oh and great tip for you winter fisherman. Do not hook up your wash out ears to your motor until you are sure all the ice in the hose is melted and you have full pressure. Dont ask. just know that the buzzing sound you hear is your over heat alarm on your motor.
 
Finally a bit of warmer weather today, and no rain! I spent the afternoon getting my new boat ready.

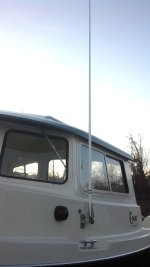
First, I installed the VHF antenna.

3_G.jpg

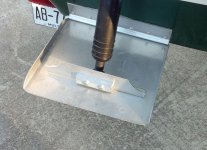
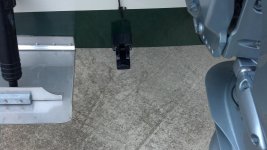
Then the zincs on the trim tabs.

2_G.jpg

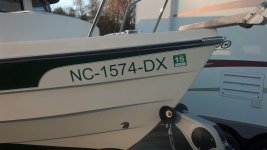
Next, the numbers.

1_G.jpg

And finally, an eye nut on the back of the bow eye bolt to provide a place to tie off the bitter end of the anchor rode. Sorry, no picture. I found three of the screws securing the trim tabs to the hull stripped, they are next on the list.
 
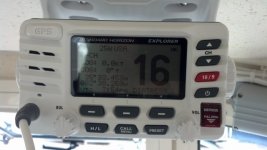
Finished up the VHF install, and yes, that GPS gets a solid signal even though it is mounted under the roof and under the shelf.

1_G_001.sized.jpg

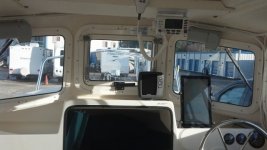
Fish finder installed.

2_G_001.sized.jpg

That pretty much finishes the dash other than the fuel flow meter, four 12 volt outlets, and two Caframo fans. Well, maybe the dash isn't really finished.

And the boat has an anchor now too along with 250 feet of line and chain.
 
Today, the transducer.

1_G_002.jpg

I hate installing transducers simply because the guy who invented 3M 4200 was a sadist. The cable clamp above the transducer was sealed using butyl tape. Way better and more easier to work with in my opinion.

Next, routing the cable to the dash, always a bit of a hassle.

2_G_002.jpg

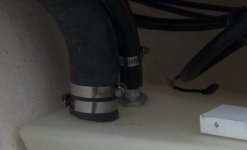
Notice the hose clamp on the fuel tank vent hose? I was surprised that the tail on the vent fitting on the tank was that long. Turned out it wasn't and the hose clamp wasn't tightened down either. Oops. I fixed that while I was there.

The next oops was mine.

3_G_001.jpg

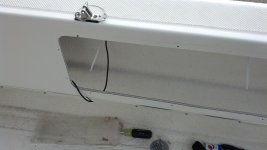
A bit of remedial cable routing was called for.

Nearly ready for the water.
 
mgarr682":297xgntd said:
Today, the transducer.
I hate installing transducers simply because the guy who invented 3M 4200 was a sadist. The cable clamp above the transducer was sealed using butyl tape. Way better and more easier to work with in my opinion.

It's fun to get to see how you outfit your gorgeous new C-Dory :thup

I don't mean to sound like a broken record (especially if you have already done this), but did you take any extra steps to seal off the transom core? I mean beyond caulk? I would personally take additional measures (overdrill, ream out core, fill with thickened epoxy, re-drill, chamfer, etc.). One other thing is that as much as I love butyl tape (and I use it quite a bit), it's my understanding that it's not suitable for use below the waterline, and I would think that lowest transducer cable clamp would be below the waterline (although maybe not in an Angler?). I've paid more attention to the Cruiser models, and they tend to sit above the gelcoat-color waterline.

mgarr682":297xgntd said:
Notice the hose clamp on the fuel tank vent hose? I was surprised that the tail on the vent fitting on the tank was that long. Turned out it wasn't and the hose clamp wasn't tightened down either. Oops. I fixed that while I was there.

Good catch!

Sunbeam :hot
 
Well my hour meter has been screaming at me to do an oil change, the heater/stove set off the CO/fire alarm and I've had a radar arch, search light and hydraulic steering system laying on the garage floor for a year.
Took the boat off the lift and onto the trailer. Did all engine maintenance several days ago and am about 50% of the way through the install of the hydraulic steering and the radar arch. Mailed the Wallas back to the shop on Friday.
Maybe after a couple of glasses of wine this evening, my artistic fingers and elbow tendinitis won't hurt so much.
Not having the boat in operational condition makes me crazy, as the weather has been wonderful over the last few days.
 
Sunbeam":57bjjbmu said:
I don't mean to sound like a broken record (especially if you have already done this), but did you take any extra steps to seal off the transom core? I mean beyond caulk? I would personally take additional measures (overdrill, ream out core, fill with thickened epoxy, re-drill, chamfer, etc.). One other thing is that as much as I love butyl tape (and I use it quite a bit), it's my understanding that it's not suitable for use below the waterline, and I would think that lowest transducer cable clamp would be below the waterline (although maybe not in an Angler?). I've paid more attention to the Cruiser models, and they tend to sit above the gelcoat-color waterline.

I thought about doing the epoxy plug thing but decided against it and sealed the two transducer screws with 3M 4200. I hate using that stuff because it can create such a mess, strings everywhere, a hydraulic press is required to squeeze it out of a small opening into the screw hole, etc. Even if I'd done the plugs I'd still have had to seal the screw holes drilled into the plug, epoxy isn't totally waterproof either. I've seen a couple of fiberglass boats built with epoxy resin that ended up blistered after several years in the water. If transducer mounts were made such that some compression could be obtained over the area where the screw enters the hull I'd have been tempted to use butyl there too, but since there is just the exposed screw threads and no way to compress the sealant I went with the goop that sticks to everything. Well, everything except the Starboard strips on the floor of the boat that hold the gas tanks in place.

I pulled one of those out of curiosity when I was routing the transducer cable over the starboard gas tank. Whatever tube goop they used there stuck to the hull quite well but when I pulled the last screw holding it in place the Starboard just fell over. The goop hadn't adhered to it at all. When I put it back I used butyl around the screw holes and around the screw heads. I know it will seal so long as I don't spill fuel on it and if I do the factory applied goop is still there although I don't think it's sealing those screws all that well.

As far as the hole for the transducer cable clamp (and another above it that isn't in the picture) I stuffed a plug of butyl in the hole, put a doughnut of butyl on the back side of the clamp around the screw hole and another around the shank of the screw just below the head. After snugging down the screw I used a small, dull pocket knife to trim away all the excess that oozed out. I'll bet that seal will last longer than the goop on the transducer screws.

There are already a dozen holes below the waterline on the transom that weren't epoxy plugged either. I'll have to pull and reseal three of the screws in the trim tabs since they were stripped when installed. I may just go ahead and pull all of them and reseal.

As far as butyl putty below the waterline, I've used it before in places on the transom of boats with no problem so long as it is used in a place where water isn't forced against it. The washdown through hull on the bottom of the boat (about 8" to the right of center on my boat and the reason the transducer is mounted to the left of the engine instead of the right) is an example of a place I wouldn't use it since the force of water hitting it at speed could conceivably erode it since it doesn't set up as hard as 4200 or 5200. Nor would I use it below the waterline on a boat that stayed in the water as opposed to a trailer boat.

I can see the lure of 4200 and other sealants for a manufacturer, grab a caulking gun, give it a few squeezes and smear goop everywhere before fastening parts hoping it is stuck to everything it needs to stick to in order to make a seal. Much quicker than pulling off a chunk of butyl tape or putty, forming it where it needs to be, then fastening the item down.

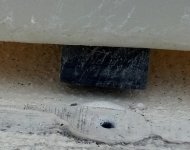
By the way, I've seen mention of wood vs foam core in the transom. On my boat (built in Oct. 2012) it was definately wood. And, under the fuel tanks, three strips of some sort of rubbery material. When I first removed the cover I thought it was just strips of wood but closer examination revealed it was some sort of rubber.

The photo below shows one of the rubbery strips under the tank and the sealant that stuck to the floor so well but left no residue at all on the starboard fastened to it. I used butyl when I put it back down and I'll pull the other three and reseal soon.
5_G.jpg
 
Back
Top