V-Berth Storage

I went through a similar process creating an anchor locker on our 16C (pictures in album). A few things that I discovered:

1. As I carved out the foam, I kept my shop vac in the compartment, running. Had very little mess elsewhere and did not have to fight the static build up.

2. Once I had it "roughed out", I used a random orbital sander to smooth up the foam I was leaving in place. Be ready to move, it removes foam quickly!

3. West System and glass cloth worked excellent to hard surface the remaining foam. The bottom of our locker is glassed foam and shows no wear after a full season of use.

Hope some of this may be helpfull to someone.
 
I also installed three hatches. well the factory installed three small ones and removed the foam. I later cut these out and replaced them with three very large hatches.

Get the biggest hatches you can and it will make a big differance in your life. Wife says its the best thing we have done to the boat, I think the downriggers are better but what do i know?

we are not able to drop a full size duffle bag thru the hatch with out pushing and proding. I have not lined the space with anthing other then the paint the factory used but may be looking into a rubber mat of some sort.
 
Has anyone opened up the area on a 25 ? What's in there - seeing the little "plugs" on the moldings, I assume they "filled" the 25 also - probably for noise. I want to put a couple of AGM batteries under the bow area, and additional water under the stbd side.
 
The 2002-2005 (?) 25's had the water tank under the bunk port side--later boats had the water tank under the aft cockpit floor (holding tank intregral with the head, instead of under the aft cockpit floor). I would wonder at what point you might be putting too much weight foreward? You always want the ability to bring the bow up, and prevent bow steering/broaching. At high speeds trim tabs and Permatrim will help with this, but at low speed, these are not as effective.

Does your boat have the water already foreward?
 
Hi Dr. Bob, Merry Christmas to you & Marie.

Yes, my '06 has the water tank fwd, port side, & holding tank aft. This past summer, with the tabs full down and the motor full in the bow still wouldn't come down to where I felt the trim was correct - when running at speed. Hull speed was OK. It seems to me that with everything full down you SHOULD be able to very slightly over trim the bow down.
 
Well, it's been just over a year since we put in storage in our v-berth and we are very glad we did it. No issues with moldy carpet to report at this point so we are happy with our set up.

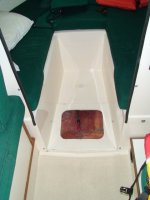
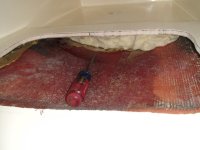
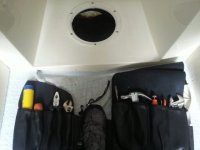
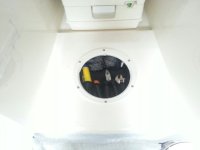
Last fall we put the new and improved lazarette covers on and have been wanting to put the old hatches to use. We finally got around to using one of them today by starting a tool locker astern of the porta pot location. Plan is to line it with carpet just like the other compartments in the bow.

After our incident with the stem guard failure and taking on water in our bow last fall, this will also serve as an easily accessible inspection hatch for the low point of the bow.

Now just to figure out what to do with that last hatch?

DSC00004_003.sized.jpg

DSC00005_001.sized.jpg

Karl
 
COOL! Just cool. All I do is think about boats, MY boat in particular, and I NEVER thought of using that space. I've thought of storage in the v berth, and just about everything else that you could, but that space never even occurred to me. Well done!!
 
Glad you brought this thread to the fore, Kushtaka. I was just looking at that small area (shown in Karl's last photo) and thinking about opening it (initially to run battery wiring across). That would be a nice little area for tools, etc. (separated from the battery wires!), and I could do an inset hatch with the cutout piece as I did on the v-berth itself so nothing would be sticking up, and the cleats would re-strengthen the area. One difference would be that I'd (even more) want to make a way to hold the hatch in place (in the V-berth I have not done this yet, and I should; but at least there the giant/single V-berth cushion pretty much traps the hatch lids in place). That could be done with a small piece of stock that could be rotated by reaching into the finger hole...

In my era boat there is a ~6" round deck hatch in the area under the Porta Potti (next compartment forward) but nothing in the first section.

Anyway, good to see this as it motivates me to get 'er done :D At some point :lol:
 
I could see making a spot for each tool you need on board in this space and fitting the top of the hatch with soft, compressible foam to hold them in place. Then it's easy to find a tool, easy to know if you don't have a tool, and easy to put them away.

Time to research what a proper tool loadout would be for the boat. Til now, I just overdo it and bring the whole giant socket set, all type of screw driver and wrench, and I think I use the same 4 or 5 tools 99% of the time. But I'm not even going to ask here. I'm sure it's been discussed, and if not, I'll start a new thread.
 
How deep is the compartment under the center section as shown in the photos? Is it deep enough to make it worth cutting and putting a hatch there after allowing for the depth of the hatch mounting?

I replaced the lazarette covers on the back of the boat with the recommended style awhile back and still have the old ones. Might be a good place to use one.
 
I don't have a depth measurement for you, but what I would/will do is use 3/4" cleat stock (epoxied to the underside) and then re-use the cutout for the hatch, as I did on the V-berth flats (sitting on the cleat). On the other hand, if depth is an issue (and why not save any room possible), perhaps one could use stout aluminum bar stock or something along those lines for the "cleats," which would take up very minimal room (1/8" or 3/16"). Also the hatch would be flush just as it is without a hatch. Hmm, there went my 3/4" cleat stock :D

Just another idea. I can see that people have used the surface mount hatches and been happy with them (and, like your boat, mine has a ~6" round deck-plate under the Porta Pottie area).

One note is that - at least on my boat - there is some "structural" foam that holds up the footwell (it's much harder than the typical open celled pour in foam, but is some type of pour in foam). That may not run aft into this compartment anyway, but just thought I'd mention it. Some support is good, but of course there are many ways to provide it.
 
The foam in ours was less than supportive in that space:)

I would guess about3.5 inches of depth at center and tapering to 1.5 at edges.

20140111_184014_resized.sized.jpg

Greg
 
Aurelia":36ntm1av said:
The foam in ours was less than supportive in that space:)

Indeed. As I think back on it, I am vaguely remembering that the foam under the main v-berth footwell is "hard" (more like surfboard foam), whereas the foam under the little round hatch (under the PP) is the more typical "soft" spray in foam. Some of this was used around the edges of the hard foam (and some boats have this latter type of foam throughout under the v-berth).

I guess it's just a matter of checking it out as you go along, and being aware that you don't want to develop a "floppy" section in the molded sole there. May not be an issue anyway, but just something I'd keep in mind if I were (and I likely will) cutting a big square out of the middle of the cored "sole" section. Shouldn't be too hard to make it as good or better than original just by thinking it over and providing any necessary support in some way.

One reason I'd like to keep it flush (presuming I put a hatch here) is that I have seen a mod wherein folks move the Porta Potti aft to that area, then use the original PP area for stowage. I don't know if I'd ever do that, but with a "flat" sole it would make the option easy (PP wouldn't "rock" on something raised).
 
Aurelia":1i712i6b said:
The foam in ours was less than supportive in that space:)

I would guess about3.5 inches of depth at center and tapering to 1.5 at edges.

20140111_184014_resized.sized.jpg

Greg

I was able to measure last night and those numbers were pretty close with nearly 4 inches of space in the center. Also, the recessed bottom design of our portapotty fits over the 8inch round hatch so I think some potty and surface mount hatch combos would work together just fine.

Greg
 
Any of you guys remove the foam and have the most incredibly sticky resin/glue smeared all over the place?

If so how do you get it off? Putty knife is no match. I thought the play would be to remove it and paint in there with some gloss paint but getting it off is worse than getting the foam out
 
I did not have that problem on mine. Just a guess but I think it is pour foam that didnt set up, probably because it wasn't mixed thoroughly. Not sure what to do about it. Maybe try acetone?
 
I was curious about acetone but wasn’t sure if it was a bad idea. It’s INCREDIBLY TOUGH to get out. A heat gun has helped but still it’s 10x harder than removing the spray in foam which was not easy. I don’t know what to do. It’s incredibly sticky. It’s incredibly awful
 
Be really careful of long time or high concentration of Acetone fumes. Mostly irritating, but can have some adverse health issues. Also it is very inflammable I know of one case where it was being used in a garage where there was an open flame water heater, and caused an explosion/fire.

I have not dealt with this residue, but I would try heat and a sharp putty knife to start with. Acetone does soften gel coat, especially if allowed to pool on it.
 
Back
Top