Vberth Insulation

kennharriet

Member
Joined
Jan 22, 2009
Messages
551
Reaction score
4
C Dory Year
1999
C Dory Model
22 Cruiser
Vessel Name
Lochsa
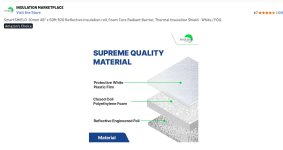
I am curious if anyone has tried this or a similar product for Vberth insulation. I got on to it watching a YouTube series on a sailboat build where they are using an Armacell product similar to this for hull insulation. It is self adhesive, waterproof, closed cell and comes in various thickness. This link to 3/4” has an Rvalue of 3. My thoughts are to potentially use 3/4”-1” on the sidewall and 1/2” on the ceiling.

It’s time to start planning for this years andventures and better insulation is on the project list. With Jay’s (Hunkydory), coaching we did the Skagway to Wrangell portion of the AK Inside Passage this past spring. Our timing in those waters was during record rainfall which really highlighted the need to better address moisture control.

As always, the groups experienced judgment is much appreciated. Thanks, Ken

 
This is a similar product that the US Navy uses to insulate our fleet of submarines on the inside hull surface areas. It not only insulates them for acoustics but also thermally.
 
I used similar stuff in a van I'm converting except it has foil on the inside (non adhesive side). I haven't had a chance to test out the insulating properties yet. However, the adhesive is quite sticky. Make sure you've got it in the correct position when you install it. You'll likely destroy the piece trying to remove or reposition it.
My concerns would be that you won't be able to monitor the condition of the rub rail attach rivets (tell tale signs appear on the inside of the v-berth when the rivets start failing) and that you'll turn the v-berth into a dark cave. I painted my interior a light color to get rid of the crypt like feeling in the berth (as my wife called it).
However, you can get white closed cell foam with an adhesive backing from this place which could alleviate the second issue above.
https://foamforyou.com/2lbs-minicell-foam-with-adhesive-backing

You can also get non adhesive foam and apply it with contact cement (3M 90).
 
I have not insulated my V-berth but I did add two small round Vetus port holes just forward of the nav lights. These are openable and help keep moisture from building up while I sleep. They also let in enough light to break that crypt like feeling. Just make sure to close them before getting under way!
 

Attachments

  • IMG_1127.JPG
    IMG_1127.JPG
    1.3 MB · Views: 5
I also installed opening ports for the berth on my boat. Improves the ventilation a lot.

port_pic.jpg
 
I used similar stuff in a van I'm converting except it has foil on the inside (non adhesive side). I haven't had a chance to test out the insulating properties yet. However, the adhesive is quite sticky. Make sure you've got it in the correct position when you install it. You'll likely destroy the piece trying to remove or reposition it.
My concerns would be that you won't be able to monitor the condition of the rub rail attach rivets (tell tale signs appear on the inside of the v-berth when the rivets start failing) and that you'll turn the v-berth into a dark cave. I painted my interior a light color to get rid of the crypt like feeling in the berth (as my wife called it).
However, you can get white closed cell foam with an adhesive backing from this place which could alleviate the second issue above.
https://foamforyou.com/2lbs-minicell-foam-with-adhesive-backing

You can also get non adhesive foam and apply it with contact cement (3M 90).
This product looks pretty good and comes in a variety of thicknesses. I would guess that a 3/16" thickness would work pretty well in the v-birth area. I have some I believe polyester fiber cloth (monkey fur) that is used on the inside of many boats that I was planning on using in my 25', but now that I see this product I'm thinking that a layer of this foam first might make for a great insulated finish. As far as the covering of the riveted area I believe that if you leaft 2" of the protective tape on that you could fold it down for inspection purposes.
 
I used this stuff from US Energy (Amazon link):
https://www.amazon.ca/dp/B00ZODN276?ref=ppx_yo2ov_dt_b_fed_asin_title
I turned the foil side against the hull and glued it on with spray on contact cement, then used white duct tape to cover the seams.
Turned out pretty good, and keeps the condensation from forming on the inside of the V berth. Probably not going to insulate as well as thicker foam, but in our area, and with the help of an Espar diesel heater with ducting fed into the V-berth, it keeps us much dryer. Really hated damp sheets and clothing in the berth!
 
Wow thanks. Looks like some better and less expensive options than what I was thinking.
 
Make sure that whatever you use is fire retardent.
 
I would guess that a 3/16" thickness would work pretty well in the v-birth area.

I have used 5/8 to 3/4 foams where I insulated the hulls of boats venturing into higher lattitudes. The thicker the insulation the higher the R value. The "mouse fir" or whatever does offer one solution. I have used various smooth surface material, becuase getting the "fur" clean if there are any contaminations, or mold growing on the "fur" they are much more difficult to clean than smoother surfaces.
 
They are Vetus ports. Vetus has changed the numbers since I put mine in, but they are very similar to the current PM aluminum series. Basically you need the smallest oval one. Because the berth trunk is curved, a port that is too long will not sit properly. If you go with the round ports you can use a bigger diameter port. In the end, the area of the opening is about the same though.

The port needs to go on the flatter part of the trunk a little forward of the nav light.

Be sure to order the proper sized screen inserts as well. They are sold separately.

For the oval port, use the right size hole saw for the radius at each end, then use a hack saw blade to cut the FG between the two holes. A round port just needs the right size hole saw. Because the Vetus ports are metric, I had to order the correct metric size hole saw online. Installation is pretty easy, but cutting big holes in the side of the boat is a little unnerving. These ports have inner and outer pieces that clamp together. There is no need for a bunch of separate holes for mounting screws.

There was a gallery on this site somewhere showing a step by step installation by someone on their boat.

Lewmar and Bomar may also make something similar. One thing to watch for when looking at ports is the minimum thickness material they can be applied to. Some ports are designed for a substantial thickness for mounting (i.e. the hull thickness).

This is a place that sells them:
https://www.mauripro.com/collections/vetus-pm-portlights
 
I have used 5/8 to 3/4 foams where I insulated the hulls of boats venturing into higher lattitudes. The thicker the insulation the higher the R value. The "mouse fir" or whatever does offer one solution. I have used various smooth surface material, becuase getting the "fur" clean if there are any contaminations, or mold growing on the "fur" they are much more difficult to clean than smoother surfaces.
Good point Bob. I was thinking the 5mm would be a good compromise as it would be flexible enough to conform to the irregular surfaces.
 
I have used 5/8 to 3/4 foams where I insulated the hulls of boats venturing into higher lattitudes. The thicker the insulation the higher the R value. The "mouse fir" or whatever does offer one solution. I have used various smooth surface material, becuase getting the "fur" clean if there are any contaminations, or mold growing on the "fur" they are much more difficult to clean than smoother surfaces.
Good point Bob. I was thinking the 5mm would be a good compromise as it would be flexible enough to conform to the irregular surfaces using aerosol contact cement.
 
I found that most of the sides of the hull conformed well with the thicker foams, (using a spray contact cement) There may be some areas right at the top which do not conform perfectly to the hull. There it may be prudent to layer several layers of thinner foam. The 5mm will conform very well in layers up there.
 
Back
Top