SO WHAT DID YOU DO WITH OR ON YOUR C-DORY TODAY??

Greg,

We've been following your progress and installation of various items on the 19. We're so pleased that you're taking such good care of her. She holds a very special place in our heart along with many happy memories.

Ruth and Joe, C-Brats #22,
R-MATEY
 
We are very happy to care for it and you will no doubt need a tour at Friday Harbor this year. I am following your progress on the 22 as well and wondering what you are doing for water and heat on that new boat after removing the tank and stove.

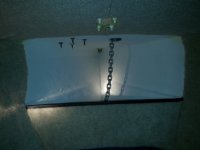
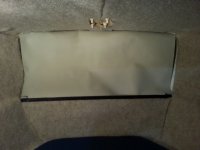
Here is my first prototype of an anchor locker shield made out of a waterproof fabric and attached simply with industrial velcro at top and bottom. Really want to keep the anchoring goods from mixing with the bedding and I figured I would try this before just fiberglassing the area in and adding a hatch. If it works well enough I will trim it up a bit more for a nicer look. Trolling motor info added in separate thread.

20140309_185345_resized_1.sized.jpg

20140309_185411_resized_1.sized.jpg


20140309_190544_resized_1.sized.jpg
 
Aurelia":mdaoijby said:
We are very happy to care for it and you will no doubt need a tour at Friday Harbor this year. I am following your progress on the 22 as well and wondering what you are doing for water and heat on that new boat after removing the tank and stove.

Our cruising time is usually 4-5 days so we don't require a lot of provisions. For heavy water use we carry about 4 one gallon bottles. Refill as needed. Small cooler holds our 16 oz water bottles and Joe's Lipton tea bottles. For heat we use an electric ceramic heater while in port. If anchored out we've used a Coleman propane heater but it died just about the time we got the tug. We've been admiring the 1300 Wallis that you've installed. Looking forward to the tour of your 19 CD. This 22 we have will never be a beauty queen but she'll be safe and sea worthy.
 
You seem to be careful with your money, may I suggest looking at "Mr Heater" you can get it on amazon. It runs on a small canister of LP and can be adapted to a big tank with no real problem. Its the price that knocks me out $90 and it's good. If you've got the money I guess it's not an issue all the best on your renovations.
 
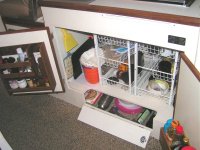
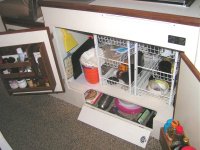
Well, the under-galley slide-out shelving units on Daydream are gone! The vinyl had peeled off the wire racks and the glides had started to rust, so it was time for them to go! Here is what they looked like new:

PICT0026.jpg

The level floor under the galley was a David from Anna Leigh design. He drew it out for Andrew (who now fortunately makes Ranger owners happy like he used to do for C-Dory owners), and Andrew said "No problem, we'll build it for you." That level floor could have become a standard feature on CD25s! But as far as I know, only Daydream and Anna Leigh have it. The little fold-down door under the level floor lets us store stuff like Saran Wrap and aluminum foil underneath.

The immediate issue, though, is what to replace the slide-out shelving units with (OK, with what to replace the slide-out shelving units, for grammar Nazis, of which I am one). We have a temporary solution, some cheap plastic drawer units from Target, but I am looking for a classier long-term solution. Anyone with a great idea, please chime in!

In the meantime, the level floor has been pulled out, cleaned up and will be painted with epoxy paint tomorrow, and the area underneath has been thoroughly cleaned, as it had accumulated a bit of grunge since 2005! The floor will go back in looking clean and new! The whole interior is getting a good cleaning and a hard look for improvements we can make.

One crummy thing about the 2005 Reynolds-era CD25s is that the interior cabinetry was not done with stainless angle brackets and a lot of them are just a rusty mess. Those are all getting replaced.

Maybe we'll be done by Friday Harbor, maybe not, but not for lack of trying!

 
Patty here. And I have completed new curtains for Daydream with my fabulous Sailrite heavy duty sewing machine. We like being able to close a curtain at will so ours are on a track that let us pull them shut when we want. With these new curtains, I watched a video on the Sailrite site that showed putting an insulated backing on your curtain to keep heat out in the warm weather and heat in in cold weather. I'm excited to see how these perform. I did that for the front 3 windows. They are classy, kind of like the class of the Ranger Tug curtains. Pictures to follow, maybe.
 
Put time into a few more finishing touches to complete on DC and AC wiring and we now have a basic shore power connection for charging and a little heating. We also have power for the bow trolling motor and for charging the Torqeedo while under way.

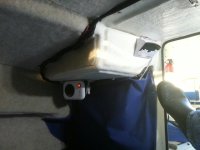
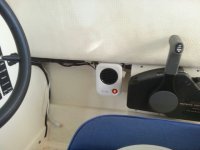
Mounted a couple of small 200w heaters in the berth and cabin for shore power and storage use. Also put in a heated mattress pad and controller for preheating the berth mattress at anchor or a dock. It only uses 127 peak watts so I can see running it even on a little inverter for an hour before bed in the colder months.

20140314_173628_resized.sized.jpg
20140314_173652_resized.sized.jpg

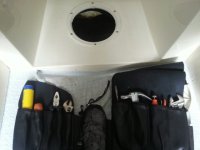
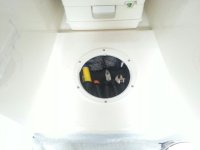
Unpacked a bunch of stuff from previous 2 boats into Ari and starting to settle in with tool storage and spares storage plus sorting out some of fishing gear and a place to put in on the boat.

20140315_112020_resized.sized.jpg
20140315_112055_resized.sized.jpg

Still waiting on our canvas guy to get started on the design we want and it looks to be started about two weeks from now.

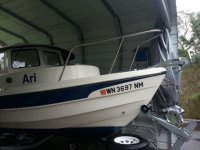
Did the de-naming cerimony today and put the new name on.

20140315_114729_resized.sized.jpg
 
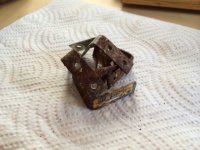
After removing the wire racks, I pulled out the floor. Patty painted it with expoxy paint (three days to cure), and am hoping to get it back in today. I also pulled out the lid and side to the storage area beneath the helm, and removed all the rusty corner braces in both areas. In 2005, at the height of the C-Dory building frenzy (they were aiming for 60 boats a month, don't know how close they came, but the place was a beehive, there was a big sign on the wall that said "Saturday is a mandatory work day for production workers"), I guess if they ran out of something, they used whatever was on hand. The corner braces were zinc plated not stainless and the screws were mismatched sizes. There was no evidence they had sealed the screws going through the sole, and I hope there is not a problem in there from water intrusion, no way to tell without doing more than I want to do. I sealed all the screws going back in the sole with 5200. You might was to take a look at the corner braces in your own cabinetry from this era. Here are only a few of the corner braces I pulled out.

Rusty_Corner_Braces.sized.jpg


Pat Anderson":6cedrasg said:
Well, the under-galley slide-out shelving units on Daydream are gone! The vinyl had peeled off the wire racks and the glides had started to rust, so it was time for them to go! Here is what they looked like new:

PICT0026.jpg

The level floor under the galley was a David from Anna Leigh design. He drew it out for Andrew (who now fortunately makes Ranger owners happy like he used to do for C-Dory owners), and Andrew said "No problem, we'll build it for you." That level floor could have become a standard feature on CD25s! But as far as I know, only Daydream and Anna Leigh have it. The little fold-down door under the level floor lets us store stuff like Saran Wrap and aluminum foil underneath.

The immediate issue, though, is what to replace the slide-out shelving units with (OK, with what to replace the slide-out shelving units, for grammar Nazis, of which I am one). We have a temporary solution, some cheap plastic drawer units from Target, but I am looking for a classier long-term solution. Anyone with a great idea, please chime in!

In the meantime, the level floor has been pulled out, cleaned up and will be painted with epoxy paint tomorrow, and the area underneath has been thoroughly cleaned, as it had accumulated a bit of grunge since 2005! The floor will go back in looking clean and new! The whole interior is getting a good cleaning and a hard look for improvements we can make.

One crummy thing about the 2005 Reynolds-era CD25s is that the interior cabinetry was not done with stainless angle brackets and a lot of them are just a rusty mess. Those are all getting replaced.

Maybe we'll be done by Friday Harbor, maybe not, but not for lack of trying!

 
Here's the image of the corner braces.
Rusty_Corner_Braces.sized.jpg
Pat - those look about the same as the ones I pulled out of my 2003 CD 22. I replaced the ones in the corners with stainless steel brackets. Of course, it's impossible to find ones with the same hole pattern as the cheap zinc ones so I wound up repositioning the new ones. For the ones into the sole, I drilled out and filled with thickened epoxy. I didn't find much wetness in those holes but there was a teeny bit that didn't go more than a 1/4" or so. However, with my fishing and going in an out a lot on very rainy days, I'm sure there was considerably more water in my cabin than yours has ever seen. Also, I did have a leak around the water fill for part of the first year of ownership and when it rained hard, there was a couple of times I wound up with an 1" or so in the cabin (until I found and fixed the leak). So bottom line, your balsa core probably doesn't have much of a problem.

If you do decide to do something different with the connection between the cabin sole and the vertical parts of the cabinetry, I'd recommend you do what I did and copy what Dr. Bob did - e.g. use fiberglass tabs to hold the wood to the floor. That was actually pretty quick and easy to do and (once you've filled the other holes), it eliminates any holes into the sole.
 
The exact same style were in my 2002 22 Cruiser (which was built in late 2001, so not in the big production atmosphere). Mild steel, screws into the core, no sealant. Mine weren't rusty, but that's just because my boat was pretty much unused and stored indoors. Otherwise they would have looked just like yours.

At first I figured I would remove them and tab the cabinetry in place. I've done fiberglassing/tabbing before, so it was the natural first thought. I didn't want to have to remove the "paper" (white) coating from the furniture, and I wanted to keep the furniture removable, so I was going to do it Albin style, and lay the tabs up against a barrier (packing tape) on the furniture side, then screw the tabs to the furniture (but they would be glassed in the usual way to the sole).

This was going to turn into a slightly bigger mess/project than I wanted at the time, and too, the furniture is totally non-structural, so my mind turned to other ways. I started with the water-tank locker, since I had it apart. I decided to use pre-formed fiberglass angle (McMaster-Carr), slice it into small sections, bond them to the sole (epoxy or methacrylate), and screw them to the furniture. They would cover the old holes (which I overdrilled and filled, to seal the core).

This worked reasonably well, but was a bit fussy (getting the angles smooth and nice, plus dealing with the angles that were not exactly 90º). And it still felt like more than was really needed (not that that usually stops me :wink: ). So I decided to try something even easier, since it would be completely reversible if it didn't work out: I bought some slightly larger stainless steel angles, and bonded them to the sole with epoxy (WEST System 610, which oozed up into the screw holes for a "lock"), then screwed them into the furniture. On most of them, one new screw hole fit into an old one, and the other old one was covered (then there was one new one). I was able to easily custom bend the ones that needed non-90º angles. The furniture is removable if desired.

Now, this is not structural in any way. The angles are only bonded to the gelcoat/glass surface of the sole. So there is the chance I will see some failures. But maybe not. I decided to try it, because if they do "fail," nothing will really happen, and I will be able to cover up any resultant issues (most likely a bit of sole top layer peeling up) with real tabbing or a fiberglass angle without too much trouble.

We'll see how it goes. I will try to put some photos in my Sunbeam thread at some point in time.
 
Yes, drilling out the screw holes through the sole and filling with epoxy certainly would have been the preferable way to do this, but I didn't - I just gooped the screws up well with 5200 and put them back in the existing holes. I found stainless 1-1/2" x 1'2" stainless corner braces at Home Depot that exactly matched the old ones. I am done on the starboard side, still have the port side to do. Pondering, not skilled with this stuff.
 
Pat Anderson":xd2zn93i said:
Yes, drilling out the screw holes through the sole and filling with epoxy certainly would have been the preferable way to do this, but I didn't - I just gooped the screws up well with 5200 and put them back in the existing holes.

Well, to the good, that's already a lot better than it was. Overdrilling/filling isn't bad once you have the tools/technique down, but if you don't, it can be more intimidating/fussy to start with.

Pat Anderson":xd2zn93i said:
I found stainless 1-1/2" x 1'2" stainless corner braces at Home Depot that exactly matched the old ones.

:cry I can't tell you how many places I looked for matching ones! I may have found ones that were a similar size, but then the holes didn't line up... I can't remember for sure. OTOH, once I decided to bond them down, the larger size I ended up with was a plus. Still, good to know a source for matching ones :thup
 
All the rusted-out corner braces on the starboard side have been replaced. Of all of them, I think the core under the sole on only two of the many, many holes was punky - the screws did not grab but were well gooped with 5200. The stainless corner braces that match up exactly with the zinc plated originals were bought at Home Depot and are Everbilt 527 283, if you are looking for them. I expect I will to do the drill and fill routine in those two screw holes sometime in the future.

The under-galley floor has been painted with epoxy paint and is back in place, and looks like a million bucks. We have a "maybe" solution to replace the slide-out racks, more when we are confident that the plan will work!

I have not yet started on the corner braces in the cabinetry on the port side, not sure what I am looking at there, but I have it pretty well down after the last couple of days, and I am well supplied with stainless corner braces - I bought all they had at the Bellingham Home Depot!
 
I finally had a chance to go up to the boat to do a few projects before putting C-Dancer in the water permanently.

I finally got over the stigma of working on boat outboards and decided to change the oil and gear oil on the Suzuki DF90. After watching the YouTube video by a good ol' boy named D-Ray working on his DF140, I decided I could handle the job. It was messy and of course took longer than expected but isn't that always the case?

Then I finally had the right tools to pull the engine side cover off to inspect the potentially corrosive plug caused by dissimilar metals. This problem has popped up on many Suzuki's of this vintage as well as Johnson branded motors. The plug looked clean on the outside. I finally pried the bolt loose with a hex socket and the inside looked normal. The inside portion of the plug with the threads was slightly corroded but nothing unusual. So I installed the new aluminum plug and am happy to report that a potential disaster was averted. Thanks Tim for the heads-up.

Then it was time to bid Twin Bridges goodbye (again). We love the facility and the people but the distance has become more of a deterrent.

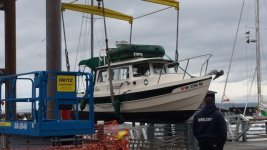
I towed the boat down to Edmonds and used their nifty sling launch to put it in the water. Two things of note. It was the first time I used the trailer since dumping a lot of money into last year to get it back into ship shape. New tires, new brakes, new stainless steel calipers, wheel bearings packed...the whole shebang. It ran great, like new! Karl at EQ did the work and he did a good job.

I was also able to try out the new prop since I installed it last fall just before putting the boat away for the winter. I can't wait to give it a more thorough test. Maybe this weekend! BTW, pics are in my album.

So all in all, our 10th boating season has started. I can't wait!

20140315_163851_001.sized.jpg
 
ATTENTION ATTENTION

C-BRATS

New source for Stainless 90' Angle brackets

"and I am well supplied with stainless corner braces - I bought all they had at the Bellingham Home Depot!"
Pat. Good on you, get it where and when it's available..... :lol: :lol:

Someday, when I get past the w@]< thing, I am going to do just what you are doing. Clean it out down to the paint, and go up from there.

Harvey
SleepyC :moon
 
Spent about 6 hours on the boat yesterday. 2 with one of the Marty's from Rodgers Marine working out some radar alignment issues and getting some training on the new WatchMate Vision AIS. This is going to be nice. Then spent some time with family on the Columbia from the airport, down to Kelly Point Park and we turned up the Willamette and went up into downtown Portland.

On the return up the Columbia, going past the railroad bridge, I fell in behind a tug and 100ft grain barge, about 200ft aft of the tug, kind of knowing down the chop, and running just to the side of his prop wash.

Learned something here. As we followed on, going under the I-5 bridge, I realized that the bow waves from the barge were reflecting back off the bridge supports, giving us a nice 3+ ft wake to "play" in. Of course, they were bouncing off of both supports so it was real fun. Kind of like coming through Cattle Pass at the wrong time and riding in a washing machine. This river boating has it's own special points to keep in mind.

Harvey
SleepyC :moon
 
Sue and I returned Thursday from 10 days spent on Roosevelt Lake and Apache Lake which are about 40 miles south of Payson AZ and 50 miles east of Phoenix. We had great weather on the lakes, temps from 42 to 81 degrees and only one afternoon rain shower. From Roosevelt dam to the Apache Lake Resort boat ramp you have to travel over 14 miles of gravel road. Next time we will no better and use the boat ramp at the Burnt Corral camp ground which is only about 6 miles in on the gravel road. Apache Lake was our favorite out of the two. On the way back home to Colorado we spent the night on the boat in the Mogollon Rim Visitor Center parking lot. We awoke to a temperature of 22 degrees and wondered why we had left the warm weather at lakes.

Bill
 
Well we're all back from half the winter spent in Kona Hi, all ready to get cruising. We stayed with friends here in Nanaimo as we sorted thru what needed to go back aboard. We put up our new camperback, went right back on like I knew what I was doing. Plugged in the new Dometic fridge/freezer so no more hunting for ice. Checked all boat systems, batteries, steering etc. all good, the small solar panel kept the house battery up all winter. We store outside under a big tarp, and this year went with all windows closed and several bowls of Dri z air and we were completely dry and fresh smelling when I opened the door. Nice. Needed a bit of air in the tires and that was it. Got launched today with a beautiful spring day and we'll stay at Newcastle Marina till end of April then start heading for FH gathering. A slow cruise thru or Gulf Islands is up first. The boat feels great and we're excited to be back aboard.
George and Carolyn.
Any C Brats moving thru Nanaimo, let us know. Love to meet you
 
Back
Top