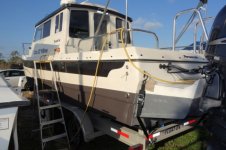
SO WHAT DID YOU DO WITH OR ON YOUR C-DORY TODAY??

Since I can't go anywhere I just keep on making projects for the Annie M.
Clean, Clean and Clean.
New SeaDek Floor
Redo the wiring, tired of the birds nest behind the panel
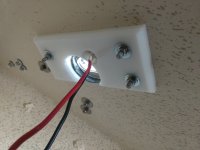
Added Volt meter. had a 2" hole anyway from when the boat had a Honda
Added ICOM M330G with antenna
Got my MMSI Number
Added Racor gas Filter
Got nice burgundy covers for the bumpers
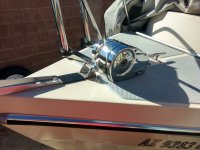
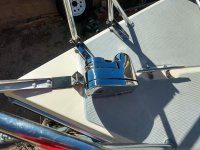
Put electric winch on the trailer
New nice looking White Wheels and new tires for the trailer
New Battery just to be safe.
Varnished the teak on the table with 8 coats.

All this on a 16ft Cruiser.

Yes really bored. Hope I can get shot so I can put the boat in the water this coming summer!!

Ken
 
We went to Catalina Island twice this month after reports of an uncommon nuidibranch, Apata pricei were found at Willow Cove.

We anchored in the middle of the cove and found the critters on eel grass less than five feet from our anchor. Sometimes it's better to be lucky than good. We returned this week but most of the nudis have moved on.

Willow_Cove_DSC2470.jpg

Apata_pricei_DSC2431.jpg

Apata_pricei_DSC2479.jpg
 
During our Havasu trip awhile back the Mrs. had mentioned her dislike for the milk crate I was using to hold our anchor rode and chain. "Ghetto" was the term she used if I recall correctly.

So, the solution to "De-Ghetto" the Desert Dory was to purchase a Lewmar Pro Fish 700 windlass. Since I have a little time off from work, and the weather is your typical AZ winter days hovering between 60 and 70, now is the time for the install.

I'm not a fan of drilling holes and whatnot in the boat so it took me a bit to get up the gumption to go out there and get busy. Once I decided to commit I was all in.

One of the decisions while planning was whether or not to shim the windlass or grind/sand the nonskid where the windlass was being mounted. Since I'm all in at this point, I decided to go ahead and remove the nonskid so the windlass will sit nice and flush on the deck.
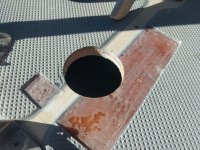
IMG_20210101_120038461.jpg


Having done that, and drilling the ENORMOUS 3" hole thru the deck, and the mounting holes, I dug out the balsa core a bit and brushed everything with wet epoxy.
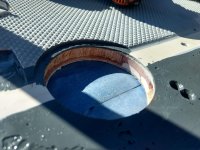
IMG_20210101_132021233_HDR.jpg


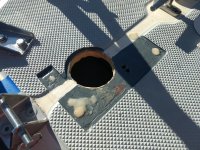
Once the wet epoxy kicked and got tacky I went ahead and filled everything with thickened epoxy. I'll give it a day or two to cure then sand, drill, and paint it all again with that dark gray epoxy paint.
IMG_20210101_150611748.jpg


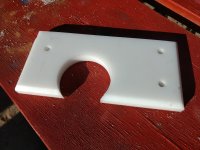
I also had a piece of poly board laying around so I decided I would make good use of it and use it for a backing plate for the windlass.
IMG_20210101_150850062.jpg


Tomorrow I'm hoping to get the windlass bedded/mounted and move on to the wiring portion. Just waiting for some 4awg to arrive now.
 
Desert,
I have the windlass version with the vertical motor. The 2 Lewmars seem quite similar except for the topology of course. I've considered converting to a horizontal version like you have since I believe the vertical motor has a greater chance of being fouled with crud, sand, mud , etc.

I'm curious about that 3" hole. I haven't checked mine, but I don't think the hole into the chain locker is that large. Do you have an idea why it takes a hole of that size?
 
Sandy, I replaced the original 600 vertical windlass with a 700. Here's the topic I wrote (with pictures): Lewmar 700 installation. The hole in the deck is to fit the motor/gearbox through, plus room for the rode.

The original winch failed because of grit from the rode which worked it's way down into the gearbox. I learned this after I took the 600 apart. I recommend the horizontal windlass. They have upgraded the seal in the 700 vertical though.

Boris
 
Thanks Boris,

Yes, I am aware of these considerations. My interest was in vertical vs horizontal. Desert Dory is installing a horizontal unit where the motor does not go thru the deck. I have a vertical model where the motor does go thru the deck. I was curious about Desert's installation where his horizontal unit requires a 3" hole for the chain to pass thru into the chain locker.

My question is now probably moot since I have now checked my windlass installation, and the chain locker hole is 2.5" for the vertical model (hole for motor is 4.5"). Why Lewmar went from a 2.5" chain locker hole to 3.0" hole is still unknown to me, but the difference is not as big as I had guessed.

P.S. Boris, it was your post you reference above (especially the photos on the interior of the motor/gearbox) that first got me to think about replacing my vertical unit with a horizontal :lol: .
 
I'm not really sure why they have you cut a 3" hole. Maybe for some wiggle room for the rode to go off to the sides? No idea.

Having said that, the supplied gasket has a 3" by roughly 1.5" elongated opening for that hole. I suppose I could have used a jig saw and cut the opening to that size but I figure if the instructions say to cut it a 3" diameter hole there might be a reason to do so.

Either way, you're cutting a big hole in your deck.

EDIT: Correct! Mine is a horizontal unit. Everything up top.
 
The 3" hole is for convince and speed for commercial build. I have done some windlass installations with just the elongated cut out. Since that is the gasket and base of the winch, it does not really make sense to do the 3" hole. Drill a couple of 1 or 1.25" holes and then connect them. Use the gasket to mark the cuts.
 
thataway":12gd0i74 said:
The 3" hole is for convince and speed for commercial build. I have done some windlass installations with just the elongated cut out. Since that is the gasket and base of the winch, it does not really make sense to do the 3" hole. Drill a couple of 1 or 1.25" holes and then connect them. Use the gasket to mark the cuts.

So, now you tell me... :evil:


Anyhow, it's on there now. On to the wiring!
IMG_20210102_130214509.jpg

IMG_20210102_130150301_HDR.jpg

IMG_20210102_130136191_HDR.jpg

IMG_20210102_125722536.jpg
 
Desert,
Looks great. I'm jealous. I'd love to have a horizontal unit. Seems more robust than the vertical units too.

My guess is that Lewmar says 3" hole just because it is probably easier for most installers to drill with a single tool and a single hole cut saw bit rather than multiple steps. Easier and I presume there is no real disadvantage in having a 3" round hole vs a 3" x 1.5" hole as long as it is well sealed.
 
Nice job. Almost wish I would have done that when I installed mine last summer. I just drilled the holes, undercut them and sealed them with fiberglass. Then set the windlass down with some caulking right over the non skid. Didn't use a backing plate, as the deck seemed plenty solid enough. Did use large fender washers however under the nuts. Colby
 
A surprising number of you (342) have noticed that I’ve been organizing the Cat O’ Mine album for the first time ever. This is one miserable frigid dark boring pandemic winter, but I’ve learned how to make and title a sub-album, so it’s not a total loss.

Bottom paint job for $318!

DSC04153.sized.jpg

I bought a gallon of Pettit Hydrocoat in black (don’t pay extra for SR slime reduction, it doesn’t work here) for $130 on sale. I put two coats on almost all of the below water sponsons (except the far back) with 6” 3/16” rollers. I’ve always used Pettit ECO (no metals) for the aluminum bracket but have not been happy with it. I scraped off most of it (some tough spots still show through) then Primocon spray.

I used gray Pettit Alumaspray spray cans on the engine bracket for two reasons:

Reason #1: To make Colby jealous; he has always wanted a multi colored hull but he just won’t admit it;

Reason #2: I had two cases of Pettit Alumaspray 2 gray spray cans on clearance at $6 each can. Like box wine, these cans do not seem to be getting better with age, even though we store them in wine racks and rotate them ⅓ turn every year.

1 gal Pettit HC black bottompaint: $130
6” rollers, Scotch blue tape and supplies: $8
5 spray cans Ptettit Alumacraft 2: $30
My labor after Colby’s (most generous, thanks Colby) labor raise from $15 to $100/hour: $150 (OK, more like $400)

Grand total bottom paint job with paint that is not hazmat and legal to throw in the marina trash: $318

I think that’s a pretty good deal for a bottom job!

It’s been 10 years since a pro bottom job, so we think next year we’ll get a pro sandblasting (or soda blasting) job.

Cheers!
John
 
Reason #1: To make Colby jealous; he has always wanted a multi colored hull but he just won’t admit it;

You haven't seen our new boat's hull have you John? :o I did touch it up over summer with the left over bottom paint the previous owner gave me. It looked nice....for a day or two anyway.... My plans are to redo it sometime next summer perhaps. First I'll start with a better job of cleaning off whatever the stuff is under the paint. It's black, and if you touch it, it's on you! SO what advice do you have John? You mentioned scraping. I've got a high power pressure washer that I used before, and it seemed to get a lot of the paint off. I can't remember the name of the blue stuff, but I had been planning on using the stuff you mentioned. SO why the Alumincraft first? Or did I misunderstand? I suspect that if I do a better job cleaning off the old paint, especially where it was already chipping off, the new bottom paint will adhere better. BTW, look at one of the bow photos on my trailer sale thread and you can see what I'm talking about. Colby
 
John, don't do the sand blast--too aggressive, and may lead to blistering....Soda blast if you must, but be sure that who does it does not over do--I have seen gel coat and epoxy blasted off...

What did you do about where the bunks on the trailer are? The boat on jack stands? How did you get off the trailer?

Thanks,
 
Bob, when I recoated C-Traveler this summer I used boards against the hull and a couple of bottle jacks to get the boat off the trailer just high enuf to get a brush on the hull. First the stern then after that was dry, the bow. Because I found it took a ways to get the trailer off the axle springs I moved the jacks to the trailer cross members. I was able to get a lot of it done around where the bunks were with it on the trailer. But everything had to be done on my back under the boat and trailer.
 
Colby, I have painted more than one boat on the trailer, as well as having moved some off. I just wondered how John got the cat off the trailer. We did that with my 255 and Caracal at the boat yard, where we had all sorts of boat moving gear. The cheapest and easiest was to have the travel lift pickup the boat and then Jack stand and block. Cats can be particularly difficult when there is concern about taking load on the bridge deck. It means 2x blocking and jacking as a monohull.
 
Oops, I forgot about the different hull on the cat. I can imagine that's a little more involved than the 22 or 25 for getting up to bottom paint.
 
Colby,
If your bottom paint can be rubbed off, it’s likely an ablative paint. Most trailer boaters wouldn’t choose other options, though there are some for racers etc. As long as it is well adhered (not flaking or peeling) you can prep with your high pressure spray, or 80g sandpaper, or just a green Scotch pad (per Pettit) before Hydrocoat. You can expect an epoxy barrier coat under whatever paint they chose, likely a contrasting color, but you don’t have to scrape down to that. I used Primocon on the aluminum bracket only because I had a couple of gouges that went to bare aluminum, this requires sanding (or acid etch) to remove oxidation then immediate primer. It can also be used as a primer over an intact paint film of unknown type, but you shouldn’t need that. Then Alumacraft 2 ( a zinc product for aluminum outboard lower legs; here on the aluminum engine bracket to decrease the changes of galvanic corrosion you’d have with a copper paint over aluminum, even with a barrier primer).

My only prep on the sponsons was a good washing. Wear warm clothes for that this time of year.

I thought about getting this, but I didn’t:

https://www.jamestowndistributors.com/p ... tail/98161

The key to getting to the trailer bunk footprint portion of the sponsons is really very simple, fast and puts zero stress on the bridgedeck...you simply must have the right equipment.

First,

I text Albatross Divers and Aaron brings by his hooka, scuba gear and water blade gizmo. Depending on the amount of growth, he puts $100 to $125 on my Right Equipment (which is a Barclay Mastercard, in my particular case). 30 minutes later, SHAZAM! Clean and Done.

I have found that when any boat task challenges my ability, having the Right Equipment is critical to getting the thing done without me hurting myself, my pride, the boat, or the trailer.

The actual contact footprint on the trailer bunks is fairly small. Just loading the boat on the trailer crushes minor hard growth, but can cut up the bunk carpet. When the water is warm and shallow, I’ll scrape those areas with a plastic scraper. If I don’t keep the coating up, I get much more growth all over. When we stay around here in the summer (now rare) our favorite water destinations are only a few miles away and there’s not enough ablating to knock down growth properly. The diver is still far, far less than paying for professional bottom painting every few years.

Bob, thanks for the prep tips.

Here’s to having the Right Equipment!

John
 
Back
Top