The Cruising Adventures of Wild Blue and crew...

Jim.... I have been following this for a bit particuarly since you stated you could take 20 pounds of folks....and so far, I have not lost a pound... The secret must be in the up coming photo lessons gig.

Still fat-n-happy in TN... waiting to see a bunch of folks up in WA in less than 60 days...

Byrdman
 
We survived the boat parade! Even the inflatable lighthouse made it intact, in spite of wind gusts above 30. The number of participants was way down, but the boats that were there were decorated better than ever. Because of the wind, I had my hands full, dodging other boats, and trying to keep us crabbed into the wind so our lighthouse didn't "bow at the waist". :xlol Not much of a chance to get photos, either.

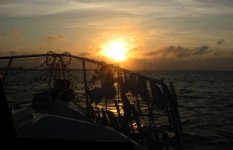
On the way to the city harbor...
OnTheWayE.jpg

Because of shoaling in the area leading into the city harbor, some of the bigger boats were judged in a different location; the parade organizers shuttled the judges from the city harbor to the Laguna, causing some confusion... and making for fewer boats to see in one location until everyone got lined up. Our island turned out to be the very best place to view all the boats.

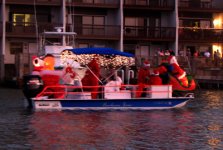
A shot of the smallest boat, before the judging began...

BeforeE.jpg
The one semi-non-blurry shot I got (I was wearing my "skipper" hat tonight, not my "photographer" hat).

The strong winds kept a lot of smaller boats home. Wild Blue was the second smallest boat participating... and the first boat to be judged. While making our "beauty pagent turn" in front of the judges, I let them know on the VHF that this boat and crew had cruised coast to coast this year - from the Florida Keys to British Columbia.

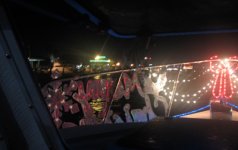
The view from the cockpit was interesting...

OurView1E.jpg
We did put the white lights on the bow on a separate cord so we could unplug that (from the cabin) while underway between viewing venues so we could see better.

That smallest boat (a 22' fishing boat) turned back shortly after going out into the Laguna... said they were "all soaked and miserable"; too bad, as he had a bunch of kids onboard, dressed like elves. Even with the spray flying, Wild Blue's crew stayed dry and comfortable.

A couple blurry shots - they were moving, we were moving, I had my hands full on the wheel...

Parade1E.jpg

Parade2E.jpg

One sailboat went aground, one of the commercial boats "brushed up" against an unlighted daymark. No damage, but with the interesting conditions of big wind, dark, a couple narrow channels with unlighted markers, bright lights on boats (messing up your night vision)... well, it was a good night to be on a boat with radar and a good chartplotter with a well marked track.

We'll find out how we did at the dinner tonight, but it was a boat-load of fun! A big turnout of enthusiastic parade watchers. We were the only boat from our island and got the biggest cheer of the night when the parade passed by our "homies".

By the time we got home around 9:30, the wind had dropped to the high teens, and it was still 74º. 5 hours, 20 miles... and only a bit hoarse from calling out "Merry Christmas" all along the way.

Big fun!

Best wishes,
Jim
 
Does look like a fun night and I bet all the lights did add to the "fun" on board along with the winds and all. Great all made it thru the night with minimal feelings hurt, and no boats hurt. More than likely, not the first time the sailboat had grounded...and if it was, well, they can now stop using "yet".

I like the blurry pirctures too Jim.... For some reason, they look perfectly normal to me.

Glad yall had a great time....and have still not lost any weight by looking at your photos.

Byrdman
 
Brother Byrd,

You don't lose those 20 pounds by looking at the photos... you have to be the subject of the photos, and in the good graces of the photographer (or on the signing side of the check :wink: ). Of course, conversely, if you aren't nice...

DontPissMeOffE.jpg LineUpE.jpg

My clients were always very nice to me. 8)
 

Attachments

  • DontPissMeOffE.jpg
    DontPissMeOffE.jpg
    125 KB · Views: 0
Now I'm beginning to wonder if ANY of your photos are untouched :twisted: Jim, now not every C-brat has met you in person so only those of us who have would know what you REALLY look like. So for those of you who haven't met Jim.......

Jim is really about 300#. In every image Jim posts, he take a bunch of weight off himself. The pictures of Joan, now that the real thing.... :wink:
 
rogerbum":3geipv0m said:
Now I'm beginning to wonder if ANY of your photos are untouched :twisted: Jim, now not every C-brat has met you in person so only those of us who have would know what you REALLY look like. So for those of you who haven't met Jim.......

Jim is really about 300#. In every image Jim posts, he take a bunch of weight off himself. The pictures of Joan, now that the real thing.... :wink:

This issue comes up when people learn what I did for a living. For full disclosure, that was my work, posting here is for the FUN of it. On very rare occasions (like the boat in lights or funnin' with Byrdman) I will work up an image for my own amusement. Almost every digital image can be improved... not to make it look better than the original scene, but to make it look as good as the way your eyes saw it.

Back in the days of film (and we used to have a custom color lab), the photo processor (either the equipment or the operator) tried to make your images as good as possible - add a bit of density, tweak the color. (If you took a negative to 100 different labs, you would get 100 different results.) This was a problem initially with digital imaging - people thought the images didn't look as good as film, mostly because they were printing them themselves on a cheap inkjet printer. And no "sprucing up" that the lab would normally do.

Consider photos you've taken of your boat: the white hull against the blue water. And when you look at those images, the hull looks dingy and the water appears gray. It may be a problem with the white balance or the exposure... and a click or two will bring that image back to what you saw. That's not retouching or "cheating" (I've heard that term all too often). If you expose the image properly (and most don't), there will be very little of that "post-processing" to be done.

So, when we share images here, you can be assured that what you see is what we saw. Since I retired, I don't have the time or the inclination to spend time working on images. But, much like Bill approaches their travels with an eye to the geology, I still see things with the eye of an illustrator. When I want to have fun with an image (or just show off), I'll try to make that apparent in a post.

Having said all that, back to Roger's premise. If you were paying me large sums of money to show you at your best (OK, maybe even a bit better than your best :wink: ), I would deliver. But, since Bill and Mike have chosen to NOT share the riches they rake in with this site, y'all are going to see it as I shot it. :mrgreen:

Best wishes,
Jim
 
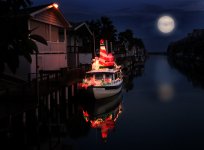
Welcome to the C-Brats Photoshop Web-Seminar! Photoshop is the tool I worked with daily in the last decade of my career as a professional photographer. In the following, we will go step by step through the shooting and creation of the following image...
LightHseUp.jpg

The first consideration for the image is its purpose. Mine was to show off Wild Blue’s Christmas decorations. Obviously, a lighting display is best shown at night. There are limitations to how much range (in f/stops and contrast) digital imaging can record. Negative film had more latitude; digital is more like transparancies. Trying to shoot small bright lights in the dark is more contrast than most digital can handle. For this shot, I used an amateur camera, a Canon S-3 (about $300).

Timing is important. Many of you have heard about “the golden hour” that photographers like - that time around and just after sunset when the light is more diffused and has a warm, glowy quality to it. This image was shot on a mostly overcast day, just after sunset (no golden hour). It needed to be dark enough for the lights to show, but not so dark that everything else was black. The exposure was f/3.5 at 1/20th of a second (exposure index of 200). Note that the docklight on the roof is on - that will give just a bit of detail to the boat and help keep the contrast between the boat and the lights a bit less. I pointed the camera to the sky to get a meter reading that would be close to the lights on the boat, and held that exposure (by pressing the button half way) to recompose on the boat. Here is the rather non-descript result...
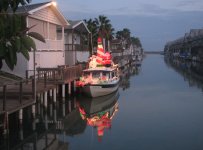
1RawImageE.jpg

With that image in the camera, I downloaded it to my Mac laptop and opened it in Photoshop. (7.0 through CS3, the following should apply) Now, the “magic” begins.

The first step is to lower the levels far enough that the lights really show up...
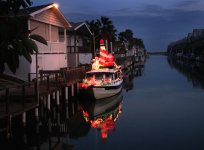
2LoweredLevelsE.jpg

That is done in Image>Adjustments>Levels. Lower the darks and midrange, raise the highlights slightly (to keep the whites looking white). Go to the Burn tool, select a large diffused brush, set it to mid-range, 15% exposure and darken the sky (like cooking, this is “to taste”). Just like the “olden days” of burning in a portion of an image under an enlarger... only you can see exactly what you are getting.

Next step is to turn day into night. Go to Layer>Duplicate Layer. This will give you an identical layer over the top of the first; consider that to be our “working” layer. Again go to Levels and make adjustments to make the overall image even darker. At this point, we are only interested in how the background looks (we are trying to create a “night” scene). Then go to the Tools palette and click on the Erase tool. Set the opacity for about 50%, use a soft edge brush, and erase only the boat and lights. What you now have will look like this...
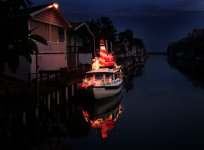
3DuplicateLayerErase.jpg

For demonstration purposes only, the duplicate layer now looks like this...
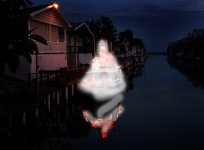
4Layer2ErasedE.jpg

What we are doing is allowing the light value of the boat to be considerably brighter than the background. If all we did was darken everything, the whites in the boat would appear “muddy” and the boat would not stand out from the background.

The next step is to create some mood. My choice is to add a moon. Go to the Marquee tool (shapes) and select oval. Hold down the Shift Key to make it a circle. Add a new layer to put our “moon” on. Go to Select>feather and make a selection of 25 pixels (may vary depending on the size of your image); this will keep the moon from looking “cut out” by having a slightly diffused edge. Pick a slight yellow/gray color (pure white will look fake) and fill the circle with that color (Edit>Fill). To make it fit with the clouds in the sky, select the Airbrush tool, pick a color from the sky, and airbrush some diffused “clouds” over the moon. I positioned the moon where it is based on esthetics (dynamic positioning) and envisioning it as an apparent light source - the scene was actually lit by the diffused skylight, mostly non-directional, but coming from over the photographer’s right shoulder. The light direction from our “moon” should look believable. The three layers together will now look like this...
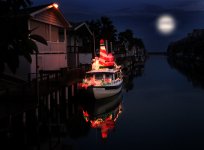
5MoonDiffusedE.jpg

Looks better, but not quite what I had in mind for the moon... I felt the need to “crispen up” the moon a bit. With the same selection circle, add another layer and make another “moon” with less feathering (try 5 pixels). The four layers now will show the moon (with a firm edge) with a slight halo around it...
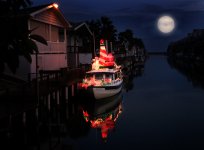
6AddMoonE.jpg

Better still, but if we are going to have a glowy moon, there needs to be a reflection in the water. Copy layer 3 (the diffused moon) and paste (this will create another layer). Move that to the position you want in the water, and use the Levels to make it a “weaker” image from the moon in the sky. Go to Edit>Transform>Flip Horizontal to make sure it looks like the “reversed reflection”. Select the airbrush tool (about 10% opacity), pick a shade slightly darker than the moon, and softly paint the water, leading back towards the moon. This layer now has the reflected moon and the airbrush water (only) on it. Go to Filter>Distort>Ocean Ripple, and add an effect to make it appear that the reflection is on slightly rippled water. Now it looks dramatic, but real.
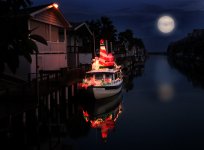
7MoonDoneE.jpg

Since I promised Warren we’d move the stars and the moon for him, we need to add some stars. Add another layer, use the airbrush tool, select a very small diffused brush and make light “dots” in the sky area. For the fun of it, I made one of the stars “twinkle” (see in the upper right of the image) by dragging the airbrush up/down and across. Subtle, but it’s all about the image. Add some stars reflecting in the water (be sure the positioning makes sense). And, we are done.
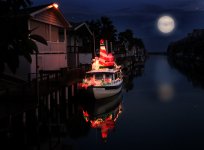
8StarsDoneE.jpg

If you want, you can add other effects like color strokes or wording to make it into a Christmas Card...
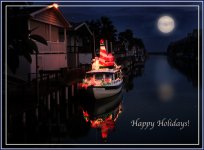
9DoneCard2E.jpg

Keep in mind that none of this work should be done on the original image. After any work on the basic image, you should do a “Save As” and then continue to work on the new file. By keeping the work in layers, you can change your mind anywhere along the way and not have to start over - simply toss out a layer, and re-do it ‘till you’re happy. Save your work frequently.

Hope you enjoyed this look into the making of an image not possible by other means. We are WAY beyond the days of “what you see is what you get” in photography... with the tools available today, you are limited only by your imagination.

Enjoy!

Jim B.
 
Wow! What a transition/creation!

We'll have to refer to you from now on as Jim the Photo Magician!

Thanks for explaining all the processes to us all!

Joe. :thup :thup :thup
 
Here's the last post about the Lighted Boat Parade...

We were a few minutes early for the awards dinner. The lady from the Chamber of Commerce was unloading her vehicle... with the prizes. We helped her carry stuff in. Joan carried a big marine cooler - nice; with a pad on top so you can use it for seating, too. I was hoping that would be one of the door prizes.

There was a nice buffet meal, and then the part we were waiting for: the awards. First they did the commercial division. We were surprised to hear that the winner got several gift certificates, but no cash (we won cash two years ago when we won our sailboat division). Then, second and third place. Then the big powerboat category... more gift certificates.

Then, the medium powerboat category... and first place went to Jim & Joan Bathurst of Wild Blue! And the main prize was that 94 quart marine cooler! Cool. Literally. And several gift certificates, a bottle of champagne, and a tote bag. No cash, but some very nice prizes.

When I went up to get our plaque, I also announced, “Tonight is our 35th anniversary. Yes, I married that pretty blonde when she was 5. And look, Honey, I have presents for you!” It got a good laugh and a round of applause.

Thanks, C-Brats, for allowing me to ramble on about this. It's been a hoot for us and hope it wasn't a bore for you.

Happy Holidays,
Jim B.
 
Congrats on winning first prize in the boat parade and a very happy anniversity to you and Joan. I will leave the numbers alone...even I wouldn't touch that one with a ten foot pole.

You both done good...!
 
Jim & Joan,

Congratulations on taking first place. We were rooting for you. What a wonderful way to celebrate your 35th wedding anniversary.

Thanks, too, for the tutorial on the Photoshop. Your explanation is much better than any manual.

Best wishes always,
Ruth and Joe /R-MATEY
 
Thanks for the kind words, folks. Sometime in the next few days, I'll post a basic Photoshop lesson on how to make and size a good photo for this forum. This will be the "101" level course.

Best wishes,
Jim
 
Jim,

Congrats on winning 1st place (with both Joan's heart for 30 + years and the X-mas boat judging!). A 94 quart marine cooler with a cushion - cool! I'm guessing the value of that is similar to what you spent on lights and fuel but the fun value is priceless.
 
Jim,
Great job winning the cooler. All it needs now is a little salmon blood in the bottom. That size is perfect for a limit of chinook.
 
Back
Top